
|
|
|
|||||||
| Register | Album Gallery | Thread Gallery | FAQ | Community | Calendar | Become a Paid Member | Today's Posts | Search |


|
|
|
Thread Tools | Display Modes |
|
#751
 07-05-2009, 04:43 AM
|
||||
|
||||
|
Since the wife and kids are visiting the in-laws this week, I spent all of the 4th of July installing the windows and associated hardware. It took 4 hours to do the passenger side including an hour and a half wasted after I learned that I had the window sash channel that bolts to the window, upside down. I couldn't figure out why the heck the window would only go up halfway before the rollers hit the end of the sash channel track. After repeated attempts at loosening, readjusting, resetting, manipulating, manhandling, I just couldn't get it up (the window, that is).
 After perusing the assembly manual (which was no help) I grabbed the flashlight and peeked into the window channel of my Grandma's '75 Firebird to see that I had the sash channel in wrong. DUH!  Once I got the channel in the correct position, it took another hour of adjusting to get the window situated correctly. It now closes quite nicely with the NOS GM weatherstripping.   The driver's side only took an hour and a half with adjustment.  And here's the final result after another 8 hour day.  
|
|
#752
07-05-2009, 08:56 AM
|
|||
|
|||
|
I guess it's handy to have another car around for comparison when you run into those obstacles. The car is really coming together nicely.
Just an observation, but it seems on almost all those cars, the passenger seat looked crooked.
|
|
#753
07-06-2009, 12:27 AM
|
||||
|
||||
|
Steve, you are making this look easy.
When is the wiring harness going in, or did I miss that post? What are you using for a harness (original, repop, scratch built)? It's a testament to the cost of a restoration that you will be north of 100k on this car with all the work you've put into it.
|
|
#754
07-06-2009, 03:13 AM
|
||||
|
||||
|
I used as repro engine and headlight harness since the original was melted beyond recognition. I'll have to search my filing cabinet of receipts to see what company I bought it from.
|
|
#755
07-06-2009, 03:20 AM
|
||||
|
||||
|
Today's project was cleaning the year and a half of dust from the engine and underneath the car. I spent most of the day on my back lieing on a creeper with a bucket of soapy water and rags cleaning off everything in sight. I guess the good thing about all that dust was that no overspray stuck to anything.
 I also installed the NOS exhaust tips and the honeycomb wheels and Polyglas GTs that have been sitting under wraps for 3 years now. I also installed the NOS exhaust tips and the honeycomb wheels and Polyglas GTs that have been sitting under wraps for 3 years now.   Took quite a while to clean up the engine compartment. My hands are pretty much shredded now from all the sharp edges and pointy bolts under there. 
|
|
#756
07-06-2009, 05:14 AM
|
|||
|
|||
|
Now we're talkin'; man that car just keeps looking better and better. I am going to be real disappointed when you put the last part on and can call it finished (I'm sure you'll feel just the opposite).
|
|
#758
07-07-2009, 04:13 AM
|
||||
|
||||
|
Running out of things to do at the moment so I decided to tackle the annoying unused and incorrect mounting hole in the top of the radiator shroud that comes standard when you buy the new/repro GM shroud.
Here's the before shot:  What I ended up doing was getting a 1/2" hole saw and boring out a 1/2" plug from the burned/melted original shroud that I've had hanging in the garage:  I then carefully filed the edges of the plug with a flat file and used a small rat tail file to file the hole in the new shroud. When I was satisfied with the fit of the plug, I placed a piece of tape on the underside of the hole and filled it with 5 minute sandable epoxy. I then pushed the plug into place. After it sat overnight I used my mini-mouse sander with some 240 grit and made the excess epoxy disapear. A few mist coats of SEM Laundau Black (my new favorite paint) and the repair is invisible. 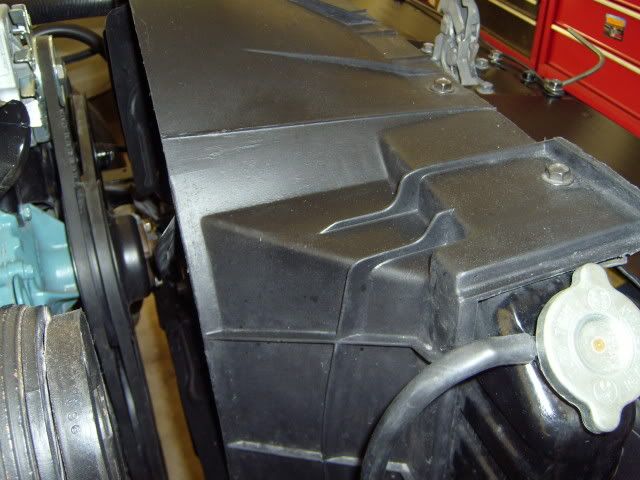
|
|
#759
07-07-2009, 07:24 AM
|
||||
|
||||
|
Looks great Steve. I am going to take your lead and use SEM Landau black to restore my original fan shroud for my Nova. Did you use SEM's plastic prep or other prep to ready the plastic for the SEM paint?
__________________
Sam...  
|
|
#760
07-07-2009, 08:05 AM
|
|||
|
|||
|
I don't like the plastic prep. I have never had a problem cleaning the surface with lacquer thinner and applying the SEM product directly.
Jason
|
|
|
|


 Linear Mode

