
|
|
|
|||||||
| Register | Album Gallery | Thread Gallery | FAQ | Members List | Calendar | Become a Paid Member | Search | Today's Posts | Mark Forums Read |


|
|
|
Thread Tools | Display Modes |
|
#312
 04-17-2018, 08:35 PM
|
||||
|
||||
|
So doors stripped and shot in Metallic Black, so I'm ready to install everything. First step? Lay everything out so I can misplace the smallest part at the exact moment I need it.
 Seems that stuff goes together a lot slower than it came apart. Seems that stuff goes together a lot slower than it came apart.  . I do know one thing..... this side will take about 5hrs, and the other side about :13 minutes. . I do know one thing..... this side will take about 5hrs, and the other side about :13 minutes.  Very happy with the results and luckily, the doors still shut like a 50k mile car should! I'll install the door panels and all that jazz tomorrow after I pick up all the stainless from the polisher. More to come! I'm in the home stretch! Headliner and glass are all that's left! Well.... and the two parts I sent out: 8-Track and the Fuel Sender. So exciting!!! Cheers  Dave Last edited by A12pilot; 04-17-2018 at 08:39 PM. 
|
|
#314
04-17-2018, 10:32 PM
|
||||
|
||||
|
Wow! I am just speechless! What a beautiful restoration.
__________________
Rick Nelson Musclecar Restoration and Design, Inc www.musclecarrestorationanddesign.com https://www.youtube.com/watch?v=62r-6vgk2_8 specializing in (only real) LS6 Chevelle restorations
|
|
#315
04-18-2018, 01:18 PM
|
|||
|
|||
|
Dave, you're a one man band and a magician. Props, sir.
__________________
1968 Camaro Ex-ISCA Show Car John 10:30
|
|
#316
04-18-2018, 01:20 PM
|
||||
|
||||
|
Agreed!
__________________
Rick Nelson Musclecar Restoration and Design, Inc www.musclecarrestorationanddesign.com https://www.youtube.com/watch?v=62r-6vgk2_8 specializing in (only real) LS6 Chevelle restorations
|
|
#317
04-18-2018, 09:42 PM
|
||||
|
||||
|
Jeeze, Guys! Thanks for the compliments! I've decided that when I put the car on display this November at this small, not very well known, Muscle Car get-together in the Chicago area...i think it's called McCRAKN or something like that..... I'm going to have a sign that reads "Built by SuperDave....Powered by Yenko.Net"
  Hmmmm... maybe not. That might set the Ford guys off in ways that would even make an NCRS guy envious! Sort of like when he's told that a bolt is wrong on his car! Hmmmm... maybe not. That might set the Ford guys off in ways that would even make an NCRS guy envious! Sort of like when he's told that a bolt is wrong on his car! Anywhooo.... moving on... Anywhooo.... moving on...The factory speedo won't read right with the old gear in there since I've changed the rear gears and the tire size. Now, being a Math major in Elementary School, I ran a simple trigonomic function to figure out how many teeth I needed on the gear. To help others, you simply take the square root of the tire pressure, multiply 1/2 the diamerphrence, then divide by 7. That number, when inverted, gives you the reason that I just Googled it! Picked up the remaining stainless trim to finish out the roof rails and glass installation, along with a pair of Koni Shock decals. Oh... and a new driver's side door regulator since I'm not happy with the smoothness of the original. The headliner goes in tomorrow!  Some detail items are the "Remove the Tie Down Brackets " decal behind the license plate and the "Battery O.K." Decal. I try and have the line worker's mindset in place when doing details like this along with inspection marks. Instead of being neat, think about their job: Mark it, put it on.... move along! Nobody aligned corners, made paint blops perfectly round, etc. So in other words...I don't try and work to hard at being sloppy. Sort of just do it.... it'll look more authentic in my book. Some detail items are the "Remove the Tie Down Brackets " decal behind the license plate and the "Battery O.K." Decal. I try and have the line worker's mindset in place when doing details like this along with inspection marks. Instead of being neat, think about their job: Mark it, put it on.... move along! Nobody aligned corners, made paint blops perfectly round, etc. So in other words...I don't try and work to hard at being sloppy. Sort of just do it.... it'll look more authentic in my book. Also had these center cap spacers made. A friend of mine runs a CNC shop and we banged these out from scrap aluminum. McQueen's original wheels were 15x6. Mine are 15x7 and as such, the offset is about 1/2" different. Looking at Hero Car pics, you can see how far that center cap sticks out. I want that look and this should do it. Overkill? Ha! When have I done anything underkill?!? Is that even a word? More tomorrow when I mount them up!  Cheers Dave
|
|
#318
04-20-2018, 01:23 AM
|
||||
|
||||
|
Headliner installation.... always fun. Throw in an overhead console and it's doubley fun! But its in. The center cap spacers worked great and put them right where I wanted them to by inside the wheel!
 Doors are all together, so what's left? Glad you asked: 1. Fuel sending unit 2. 8-Track radio and door speakers 3. Glass That's it! And that'll wrap it up for this week. Tune in next week for "Where's my damn sending unit?!" And "Who knew a windshield could break so easily!?"  Cheers Dave
|
| The Following User Says Thank You to A12pilot For This Useful Post: | ||
SS427 (04-20-2018) | ||
|
#319
04-20-2018, 01:42 AM
|
||||
|
||||
|
So, Dave in referance to that last photo of your quarter panel.....if you are just showing off your painting and polishing expertise ......it's working.....
 Mike .
|
|
#320
04-20-2018, 03:07 AM
|
||||
|
||||
|
Beautiful job on the headliner. I have done a few myself and they took 8 hours. Looks like yours took you an hour!
__________________
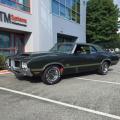
1971 W30 convert, triple green,second owner. 1971 W30 Convert, special order Rally red, under resto. 68 Charger R/T, Bullitt Replica 68 Camaro Z28,Corvette Bronze,Houndstooth www.vancouverclassiccars.com
|
|
| Thread Tools | |
| Display Modes | |
|
|


 Linear Mode

