
Dedicated to the Promotion and Preservation of American Muscle Cars, Dealer built Supercars and COPO cars. |
|
|||||||
| Register | Album Gallery | Thread Gallery | FAQ | Community | Calendar | Become a Paid Member | Today's Posts | Search |

|
|
|
Thread Tools | Display Modes |
|
|
|
#1
|
|||
|
|||
|
Just a suggestion in the spring I would take the valance off and leave it i the sun every once in a while and let it weather up a bit to match the fenders. The valance look a touch whiter than the fenders but that could be my monitor. Excellent job on making it fit so well and the paint looks real good.
|
|
#2
|
||||
|
||||
|
<div class="ubbcode-block"><div class="ubbcode-header">Originally Posted By: 67 442</div><div class="ubbcode-body">Just a suggestion in the spring I would take the valance off and leave it i the sun every once in a while and let it weather up a bit to match the fenders. The valance look a touch whiter than the fenders but that could be my monitor. Excellent job on making it fit so well and the paint looks real good. </div></div>
It's probably your monitor. [img]<<GRAEMLIN_URL>>/grin.gif[/img] The valance paint is much closer than the photos indicate. There are so many off angles and curves that a photo of the two panels at the same angle is almost impossible. The nose/bumper itself, is a noticeably different color than the fenders, hood, and valance, but that is the way they built them, so I don't want to mess with the patina. Keep in mnd, also, that the polyethylene valances not painted when installed at the factory. They were molded in a variety of colors and were way off from the actual car color. So a bad mismatch would actually be more correct then a perfect paint match. |
|
#3
|
||||
|
||||
|
The new/proper/original valance looks so much better than the steel/proper/warranty unit.
Ryan
__________________
 1969 Beaumont 350 Auto White Sold 1969 Beaumont 307 Auto Green Sold 1969 Chevelle SS 396-L35 Auto Blue Sold 1969 Oldsmobile Cutlass 'S' Sports Coupe W31 |
|
#4
|
|||
|
|||
|
"Keep in mnd, also, that the polyethylene valances not painted when installed at the factory. They were molded in a variety of colors and were way off from the actual car color. So a bad mismatch would actually be more correct then a perfect paint match."
I did not know that, great info to have tucked away. When can we expect a book on all of the info you have on theses birds? |
|
#5
|
||||
|
||||
|
When I retire!
While it was originally designed as a wire insulating material in WWII, polyethylene was such a new "Space Age" material in 1972-3, that they couldn't find a paint that would stick to it. So they molded them in body color as an alternative. It is still a very difficult process. For example, try spray painting a red or blue Solo beer cup and see if the paint sticks for long. [img]<<GRAEMLIN_URL>>/grin.gif[/img] |
|
#6
|
||||
|
||||
|
It just occurred to me while looking out in the garage that I have seen this car's face somewhere before:
Is this one of those "separated at birth" photos?  |
|
#7
|
||||
|
||||
|
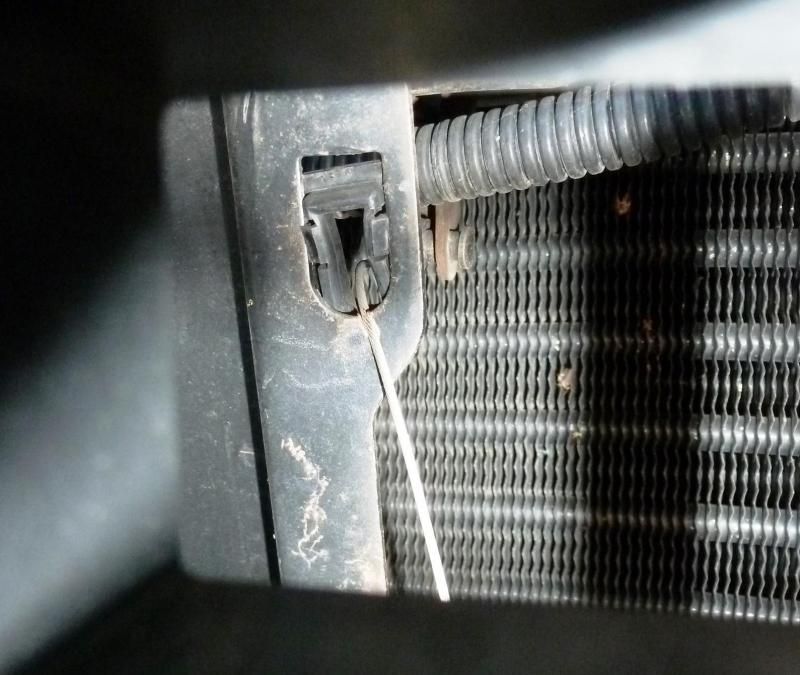
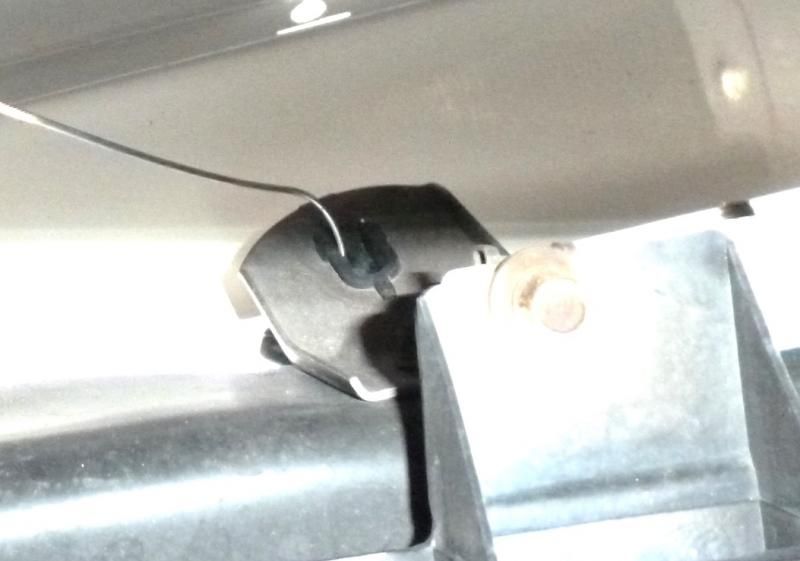
OK, here is today's conundrum: I was looking at the hood latch assembly and it appears that the grommet that the hood cable goes through is partially broken (lower locating tab is broken off) and has been for a long while. The cable is actually sawing its way through the bracket. It also appears that the grommet that the pull handle passes through has a broken piece as well. Does anyone have the grommets? It appears that they may be the same grommet for both the upper cable guide and the lower handle guide.
   
|
|
#8
|
||||
|
||||
|
I believe the GM part number is 488442, in case anyone has a couple of them sitting around. Knowing Gm there have to be other applications for this grommet.
|
|
#9
|
||||
|
||||
|
<div class="ubbcode-block"><div class="ubbcode-header">Originally Posted By: njsteve</div><div class="ubbcode-body">OK, here is today's conundrum: I was looking at the hood latch assembly and it appears that the grommet that the hood cable goes through is partially broken (lower locating tab is broken off) and has been for a long while. The cable is actually sawing its way through the bracket. It also appears that the grommet that the pull handle passes through has a broken piece as well. Does anyone have the grommets? It appears that they may be the same grommet for both the upper cable guide and the lower handle guide.
 </div></div> And a big THANK YOU to PerformanceYears.com website member FormulaBruce, who found two of the unique, hood cable grommets for me! I installed them and it's amazing how much easier the hood opens when the cable isn't sawing through the radiator support bracket. |
|
#10
|
||||
|
||||
|
That is so cool, your old car and your new car in the same magazine....
Ryan
__________________
 1969 Beaumont 350 Auto White Sold 1969 Beaumont 307 Auto Green Sold 1969 Chevelle SS 396-L35 Auto Blue Sold 1969 Oldsmobile Cutlass 'S' Sports Coupe W31 |
 |
|
|