
|
|
|
|||||||
| Register | Album Gallery | Thread Gallery | FAQ | Community | Calendar | Become a Paid Member | Today's Posts | Search |


|
|
|
Thread Tools | Display Modes |
|
#51
 07-15-2016, 11:46 AM
|
|||
|
|||
|
Thanks for the updates. Very informative and entertaining.
Motivates me to work on my 69 Charger RT Lawrence
__________________
65 Corvette Coupe L78 67 427/390 Vette Coupe unrestored 67 L-79 Vette roadster (Top Flight) 69 L71 Roadster Survivor 69 L46 Roadster Survivor (Sold) 69 Z/28 RS 69 Dodge Charger R/T 70 W30 442 Auto Air Survivor 2016 Z06 Coupe M7 70 AAR Cuda (Sold) 69 L78 Chevelle 
|
|
#52
07-16-2016, 10:37 AM
|
||||
|
||||
|
Great! Get that Charger going! I've done three. A 68, a 69, and a 70. Glad you enjoy my posts. More to come soon!
Cheers [img]<<GRAEMLIN_URL>>/beers.gif[/img]
|
|
#53
07-25-2016, 12:02 PM
|
||||
|
||||
|
TAAA DAA!!!!! This is a monumentabulous event! The metal work is 100% done as of yesterday with only one thing left to do on the initial body assembly and that's strip and prime the decklid! [img]<<GRAEMLIN_URL>>/biggthumpup.gif[/img] What did the Beater Bee need? Michigan (and Gary) took a toll on the body. Luckily, having been taken off the road permanently in 1977, the salts couldn't do more damage than they did. A driver's side floor patch, both trunk extensions, the passenger quarter needed 3 large patches (fore and aft of the wheelwell and large top portion of the wheel lip), part of the passenger outside wheelhouse, the driver's side quarter needed a small forward patch, a large rear patch, and lastly, a passenger side window corner. There's some extensive fiberglass work that I need to do on the hood. That thing really has taken a beating! It's good to see the car as a whole entity again! [img]<<GRAEMLIN_URL>>/biggthumpup.gif[/img] [img]<<GRAEMLIN_URL>>/biggthumpup.gif[/img] [img]<<GRAEMLIN_URL>>/biggthumpup.gif[/img]
  Cheers [img]<<GRAEMLIN_URL>>/beers.gif[/img]
|
|
#54
07-25-2016, 12:09 PM
|
||||
|
||||
|
You think YOUR hood is hard to align? Try aligning something with 4 pins that each go in any direction they want to and when you tighten the bolts down, they move, which screws up what you thought you had initially lined up perfectly!!!! [img]<<GRAEMLIN_URL>>/thumbsdown.gif[/img]
I think I got the gaps pretty close right now, but still some more massaging to do on. These hood pins use 5/8" heater hose as spacers on the hood. The idea is you push the hood down which compresses the rubber (never a good thing..I'm just sayin') and when you install the pin, that makes a nice rattle-free and secure hood hold down. How the heck they did this on the line in the time allowed as the car came rolling down is beyond me. This took 5hrs, 3 beers, 4 lost tools after they became airborne somehow, and a whole lot of words used I never even thought I knew! [img]<<GRAEMLIN_URL>>/thumbsdown.gif[/img]   I'm pleased with the line up so far, but there's still some tweaking to do. Cheers [img]<<GRAEMLIN_URL>>/beers.gif[/img]
|
|
#55
07-25-2016, 12:13 PM
|
||||
|
||||
 The BB is already getting excited about MCACN 2017!!! Most see some previous MCACN passes draped over the front end. I see a hood that needs some serious fiberglass work, the results of someone that doesn't even know how to spray primer, and a very rusty rotisserie that needs some attention after this thing comes off of it. UGh...more work!!!! [img]<<GRAEMLIN_URL>>/frown.gif[/img] Cheers [img]<<GRAEMLIN_URL>>/beers.gif[/img] Dave
|
|
#56
07-25-2016, 12:34 PM
|
||||
|
||||
   In keeping my restoration correct, I took about 100+ photos of my Bee as I disassembled it. Some things really caught me by surprise and others were just head scratchers! This was something I thought was neat and that is trunk hinge grease painted right over with the Hemi Orange! [img]<<GRAEMLIN_URL>>/biggthumpup.gif[/img] Do I do this on my restoration? Of course I do!!!!! Cheers [img]<<GRAEMLIN_URL>>/beers.gif[/img]
|
|
#57
07-25-2016, 12:38 PM
|
||||
|
||||
   A few more. Side marker reflectors that show the rear bumble bee stripe folded over to the inside after being applied to the rear quarter panel and then being razor slit in an "X" pattern. That black spray paint you see is from Gary after he got the car. He rattle canned the engine bay, trunk, and door jambs black since he thought it looked better. And a piece of the headliner material hanging in the back. Several Mopars I've had have this either here, under the carpet, or both. [img]<<GRAEMLIN_URL>>/cool.gif[/img] Cheers [img]<<GRAEMLIN_URL>>/beers.gif[/img]
|
|
#58
07-25-2016, 12:46 PM
|
||||
|
||||
|
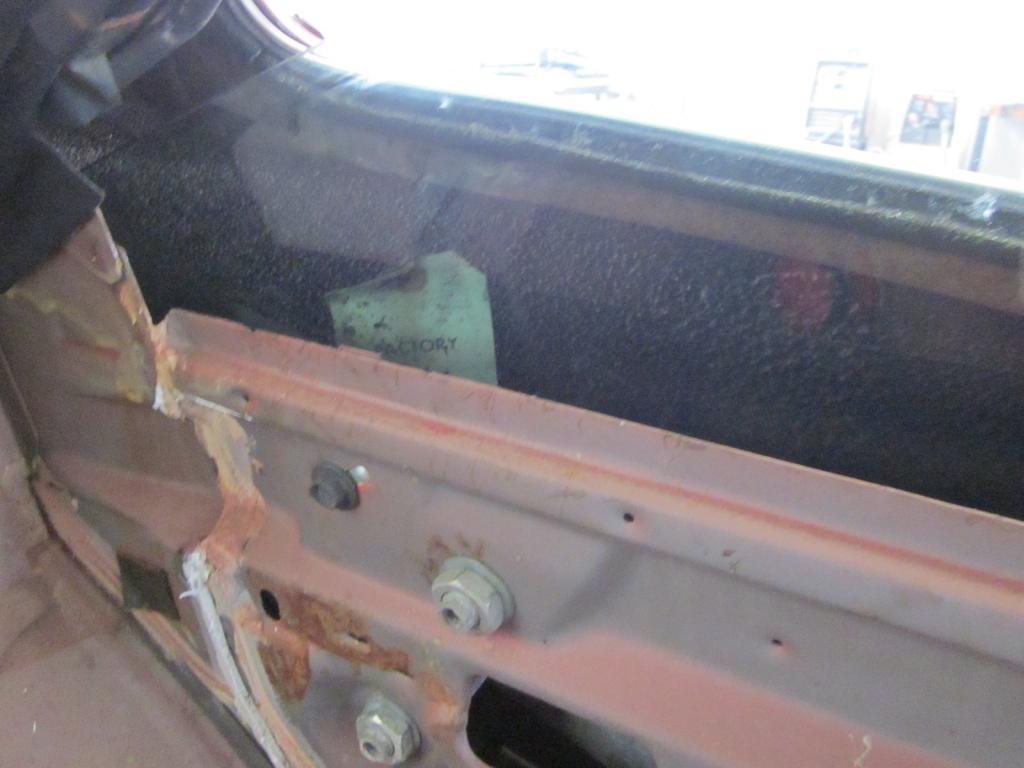
And probably the coolest thing I've found was this tag hanging in the quarter window for 47 years!!!! It's a telltale clue as to how the car was built too. The tag is a parts tag with the number of the quarter panel written on it. This tag was actually wrapped around the eyelet of the quarter panel edge where the interior panel is welded to. It is also sprayed with Hemi Orange paint as well as undercoating. So the tag was between the two panels prior to paint. The tag is a parts bin tag that says "O.K". From my understanding, the tags were applied to random parts on a pallet of parts that were "O.K." to be used on assembly. On a pallet of 20 parts, maybe there were 10 tags installed (just a guess). So not every part had them, but various ones did to let inspectors know that whole pile of parts were OK to be sent to the line and be used. Usually, they are removed but this one wasn't and has been hanging in this quarter window for 47yrs!!!!
|
|
#59
07-25-2016, 01:07 PM
|
||||
|
||||
  Here we see a factory goof!!!! You know these things happen, and here's documented proof! This is the clutch pedal bracket that helps hold the clutch pedal in place. On the firewall there are two dimples (all cars have these). If the car has a 4spd, these dimples are drilled out and then a bracket is installed with two studs. Those studs go through the holes on the clutch pedal assembly and are secured by a nut/washer combo. Well, I guess the line worker snapped a stud off, it was hammered over and a bolt/nut was installed in it's place. The hammered over broken stud was covered with sealer when they installed that in the gaps at the firewall/inner fender union. Pretty cool!!!!! You can see the factory Hemi Orange paint on the boo-boo too! [img]<<GRAEMLIN_URL>>/grin.gif[/img]  Here's the clutch pedal assembly removed, you can see the rate marking on the spring, and the two holes that brac ket goes through are at the bottom of the picture.  A better illustration. So do I keep it this way or make it right? Now why do you even have to ask that! Of course it's staying like this!!!! [img]<<GRAEMLIN_URL>>/biggthumpup.gif[/img] [img]<<GRAEMLIN_URL>>/biggthumpup.gif[/img] [img]<<GRAEMLIN_URL>>/biggthumpup.gif[/img] Cheers [img]<<GRAEMLIN_URL>>/beers.gif[/img]
|
|
#60
07-25-2016, 02:20 PM
|
|||
|
|||
|
Awesome work and documentation, appreciate the information. Can't wait to see the finished product.
__________________
1968 Camaro Ex-ISCA Show Car John 10:30
|
|
|
|


 Linear Mode

