
|
|
|
|||||||
| Register | Album Gallery | Thread Gallery | FAQ | Community | Calendar | Become a Paid Member | Today's Posts | Search |


|
|
|
Thread Tools | Display Modes |
|
#31
 02-19-2023, 01:34 PM
|
|||
|
|||
|
Quote:
__________________
'58 Apache pick up '78 Z28 4sp being restored '70 W30 convert TRIBUTE '78 Z28 32,000 survivor, Og Yellow paint, AC. '69 CANADIAN Nova SS 396/350 hp '67 CANADIAN Nova SS 427 10 sec. driver '66 CANADIAN Nova SS Race Car '61 CANADIAN Pontiac Bubble top 409+/4sp (SOLD) '31 ALL STEEL Chevy P.U. GONE (EX-WIFES NOW) 
|
|
#32
02-19-2023, 06:20 PM
|
|||
|
|||
|
Looking forward to getting back to the Nova build story.
More details and more pics please, let'er rip. Paul
|
| The Following User Says Thank You to CamaroNOS For This Useful Post: | ||
Arrowsmith (02-19-2023) | ||
|
#33
02-19-2023, 10:11 PM
|
||||
|
||||
|
Moving along (and hopefully, this thread won't cluttered up with 9-inch versus 12 bolt arguments or other "stuff" down the road), I worked on the fuel delivery system. It's been a sort of work in progress. I'll explain later...
The main premiss here was to follow what others like "stock appearing" racers use. I totally dig that idea: I didn't want a fuel cell. I didn't want a sump in the tank. I wanted the car to look closer to stock:  Some of the FAST folks are using Holley Hydramats in their gas tanks. It is heavily used in off road racing applications too. Basically, a Hydramat is a wicking agent. It absorbs fuel.  Here's a closer look:  There are a number of different choices for Hydramat configurations. Mine is setup to accept a honking -10 AN (5/8-inch) pickup. It is held to the floor of the gas tank by way of four rare earth magnets. Do they hold? L-O-L. I spent well over an hour trying to pry two apart. To move them around to where I wanted them in the tank, I used a piece of wood doweling.  Speaking of the tank  , This is a new Spectra tank. I cut that hole in the top to install the Hydramat. , This is a new Spectra tank. I cut that hole in the top to install the Hydramat.  I fabricated a cover from aluminum. When I did this, I decided I needed an easy to find gasket that is resistant to fuel. What you see is the baseplate gasket for a Holley Dominator carb.  Outback, I had a friend TIG weld a -10 AN bung to the top of the tank for the feed line, along with a -8AN bung for the return line, as well as a -8AN bung for the vent. The tank uses a non-vented cap. Here's a pic of the feed and return line AN bungs:  In order to get the Hydramat in the tank and not destroy the skin on my arm, I duct taped the opening:  Here's a peak inside the tank. The Hydramat sits alongside the fuel level sending unit. I simply cut off the original pickup tube and plugged the OEM sender fuel line (more later).  A big issue is finding hose that can be immersed in fuel. Believe it or not, AN hose doesn't like being immersed and neither does a wide range of OE-style hoses. The line must be flexible though. After a ton of research, I came up with this (below). It is hose that is used for things like snowmobiles, garden tractors and so on. It's capable of "living" inside gasoline. Acquiring it in -10 wasn't exactly easy. The fittings are from Earl's. The hose clamps are stainless steel jobs from Breeze (made in the USA). I use this same hose to handle the fuel line return inside the tank. It's not a good idea to allow the return line to spray inside the tank. Instead, the line should be on the tank floor:  Here's the tank top plate sealed up:  I blocked off the OEM style fuel pickup line internally and capped it. This way, the fuel sender still works: 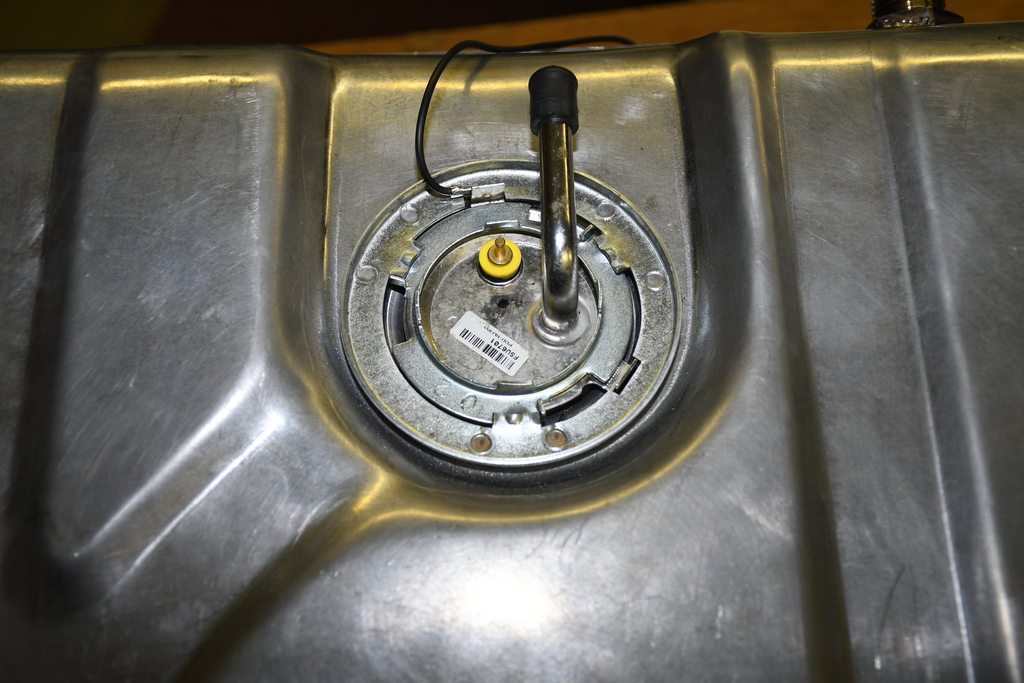 This is the -8AN (1/2-inch or so) fuel vent line. You can't see, but there is an AN breather fitting on top of the 90-degree fitting. I made a bracket out of aluminum to mount the vent line. 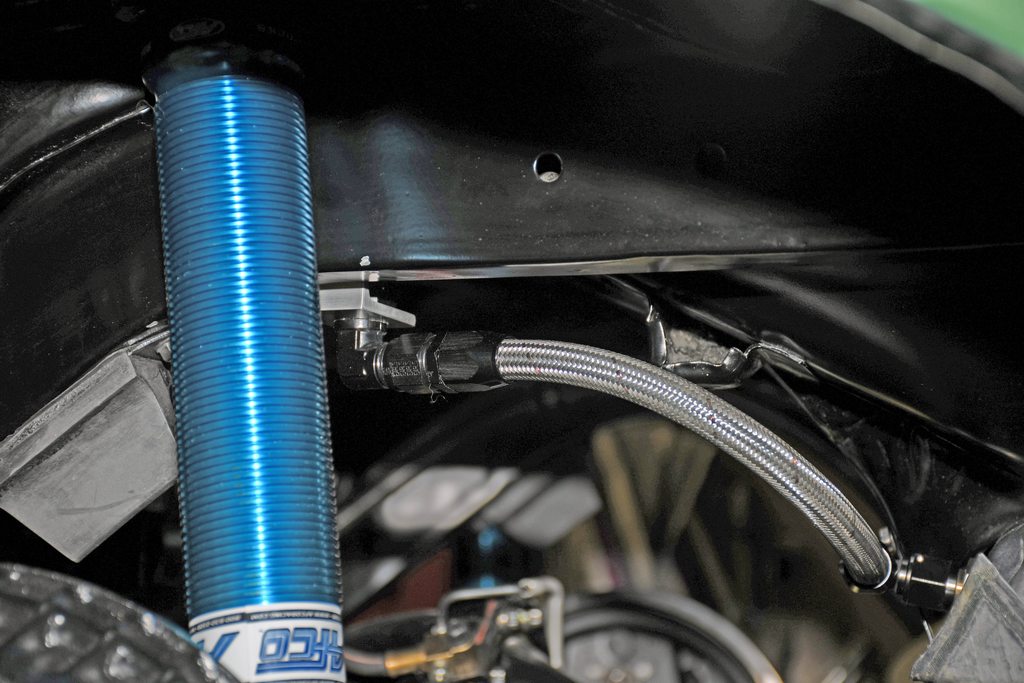 This electric pump is a recent (this past week) change. I originally assembled the car with an off-shore Holley Marine mechanical pump, an Enderle mechanical fuel injection by-pass valve and a composite fuel pump pushrod. It all worked a-ok, but it wasn't consistent. The car would run nicely and then (in almost a heartbeat), the fuel level in the floats pretty much went out of control. I believe the huge mechanical pump I was using was overwhelming the pintle in the by-pass valve. Additionally, I was concerned about the longevity of the composite fuel pump pushrod (pretty much mandatory with a billet roller cam like I'm using). The big Weldon in-line electric pump along with a Weldon regulator is the ultimate solution. That Weldon pump will pull a prime (some users claim it can pull a prime in something like 6-feet, which is seriously impressive!). Weldon's regular business is manufacturing pumps and fuel system parts for aviation. They have good idea of what's going on....L-O-L. By the way, there's a bit of camera distortion here. I could not plumb the pump directly from the bung to the feed line, hence this layout. The reason it couldn't be done is because of minimum bend radius of AN hose. Bend it too tight and it will kink (and consequently be turned into junk). Here's the pump and return line setup: 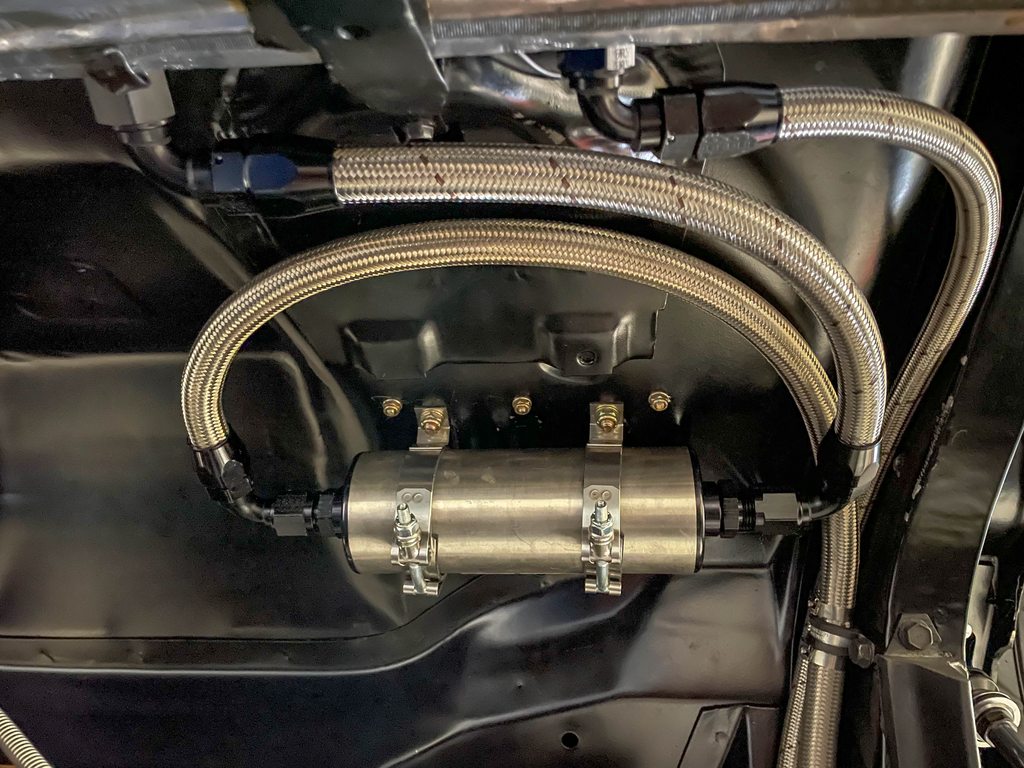 Moving forward, the Nova has a high flow -10 AN Holley billet fuel filter inline. The Hydramat acts as a pre-filter, while this is the after-filter: 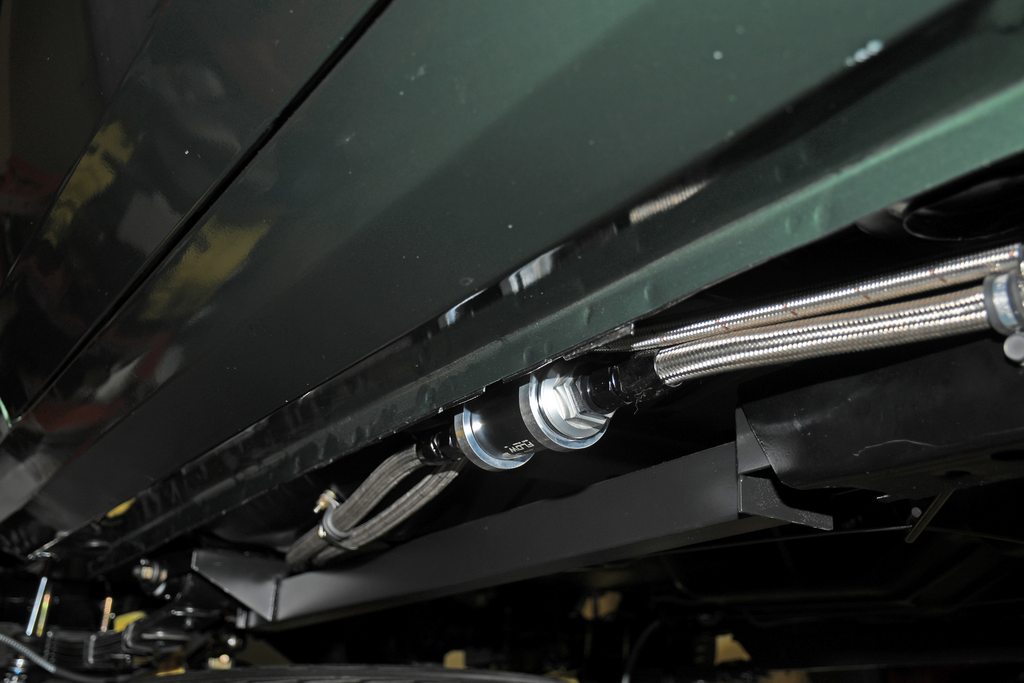 I used aircraft clamps to attach the line and stainless steel band clamps to tie the pressure (feed) line to the return line:  At the firewall, the hoses run over the inner fender to the front of the car. I don't like hoses that route close to the headers, hence this layout. I've used it in a number of builds and it works great.  The fuel and return lines run to this bulkhead under the stock style battery tray. The bracket is a simple 90-degree piece I built, and the fittings are bulkhead style. You can't see this when the battery tray is installed. By the way, I pressure test each hose after assembly. Easier to fix it now than later. Upstairs, the car is now getting a Weldon fuel pressure regulator with a return. I'll update that down the road:  That's all for now... Last edited by Arrowsmith; 02-19-2023 at 11:42 PM.
|
| The Following 10 Users Say Thank You to Arrowsmith For This Useful Post: | ||
69M22Z (02-20-2023), big gear head (02-20-2023), Crush (02-19-2023), dykstra (02-20-2023), John Brown (02-19-2023), L78_Nova (02-22-2023), L_e_e (02-21-2023), olredalert (02-20-2023), Tenney (02-20-2023), Xplantdad (02-20-2023) | ||
|
#34
02-20-2023, 01:15 AM
|
||||
|
||||
|
Looks great Wayne!

__________________
Bruce Choose Life-Donate!
|
| The Following User Says Thank You to Xplantdad For This Useful Post: | ||
Arrowsmith (02-20-2023) | ||
|
#35
02-20-2023, 04:58 AM
|
||||
|
||||
|
Great details and pics Wayne.Great build bud!!
__________________
https://www.youtube.com/watch?v=gkDf7PPRzJ0
|
| The Following User Says Thank You to BJCHEV396 For This Useful Post: | ||
Arrowsmith (02-20-2023) | ||
|
#36
02-20-2023, 10:29 AM
|
||||
|
||||
|
I love your attention to detail. Great job!
__________________
Dave Dykstra 1968 Camaro Palomino Ivory/Ivy Gold interior -Delivered to Courtesy Chevrolet, Los Angeles, CA 2013 Corvette Grand Sport 60th Anniversary -Delivered to Bill Jacobs Chevrolet, Joliet, IL NCRS#66003 Education is what you get when you read the fine print. Experience is what you get if you dont.-Pete Seeger Dykstra Motorsports
|
| The Following User Says Thank You to dykstra For This Useful Post: | ||
Arrowsmith (02-20-2023) | ||
|
#37
02-21-2023, 08:55 PM
|
|||
|
|||
|
Did you keep the rear shocks (AFCO's) in the stock locations or did you move them inboard? You have mentioned in the past that the lower shock mount inhibits the tire?
__________________
'58 Apache pick up '78 Z28 4sp being restored '70 W30 convert TRIBUTE '78 Z28 32,000 survivor, Og Yellow paint, AC. '69 CANADIAN Nova SS 396/350 hp '67 CANADIAN Nova SS 427 10 sec. driver '66 CANADIAN Nova SS Race Car '61 CANADIAN Pontiac Bubble top 409+/4sp (SOLD) '31 ALL STEEL Chevy P.U. GONE (EX-WIFES NOW)
|
|
#38
02-23-2023, 12:22 AM
|
||||
|
||||
|
Time for another update.
I selected AFCO double adjustable shocks for all four corners. These are great, very adjustable, rebuildable and ultimately re-valveable shocks. Out of the box, the rear shocks were setup to be mounted upside down (shaft down, body up) as shown here:  This places a bulky part of the shock body very close to the tire. Additionally, some of my class drag racing pals suggested mounting them upside down is a good way to make them leak. So I decided to re-mount them right side up (next photo). Changing the hardware to accomplish this isn't a big job. Perhaps a half-hour to get it done:  This is the rear compression adjuster on the AFCO shock. Turning the knob clockwise firms up the compression; turning it counter-clockwise softens it.  The rebound adjuster on the back shock works the same way: Turn clockwise to firm up the valving; turn counter-clockwise to soften it.  On the front shock, the rebound adjuster is located here (top of the shock behind the inner fender dust shield). The adjusters work the same as the rear shocks:  The compression adjuster is located here, just under the spring pocket:  A-arms for the car are from Detroit Speed. They're nice pieces with easily adjustable caster. They have Delrin bushings top and bottom. Here's the upper and lower:  Ball joints bolt in (top):  The a-arm cross shafts are Billet. Those slugs that fit into the cross shaft are caster adjusters:  Here's a close up look at the upper bushings:  When the car was initially setup, I figured I'd go with a set of large body tapered coil/over springs. Unfortunately, they present all sorts of issues. Number one is, you can't easily establish ride height with them, even with collars on shock body. Number two is, the shock must be mounted on the top side of the lower a-arm (not the bottom as normal). Installation wasn't exactly fun. Basically, it sounded logical in the beginning, but it's a nightmare arrangement. 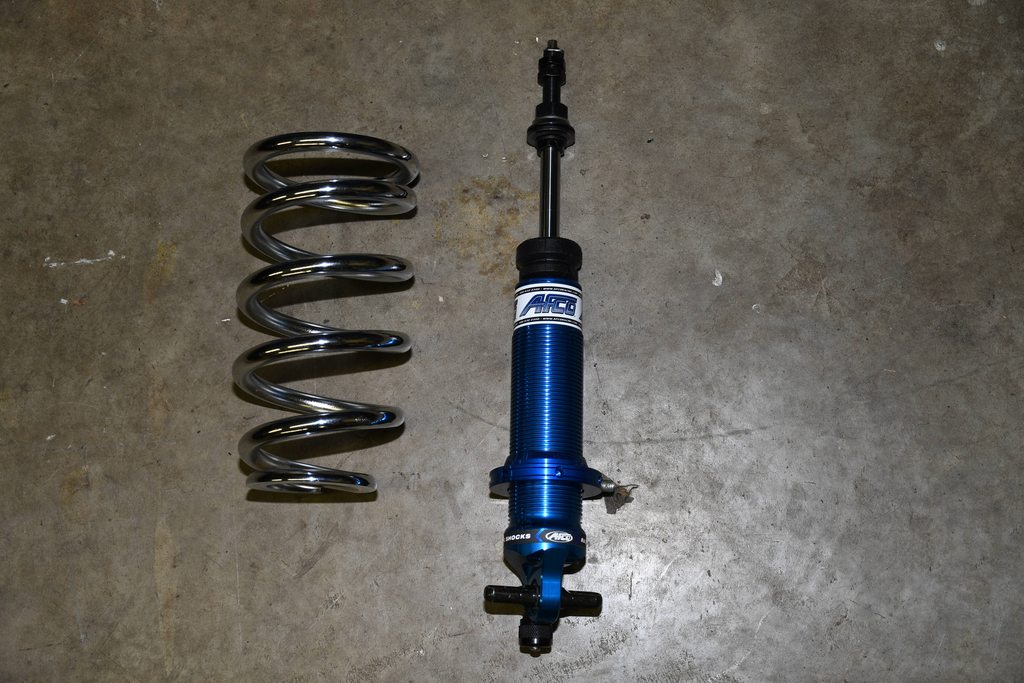 The solution was to go with a conventional style spring. As you can see, it has the potential to store far more energy than one of those short tapered jobs: 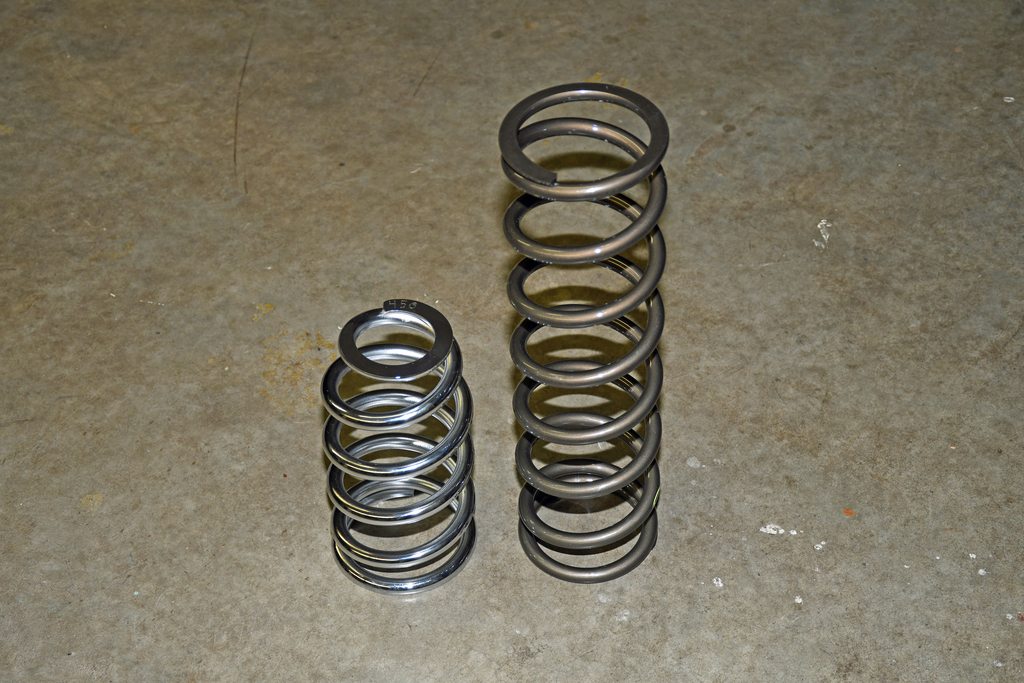 In order to fit the big body AFCO front shock through the lower a-arm, you have to cut away the lower a-arm and fit this adapter ring (from AFCO): 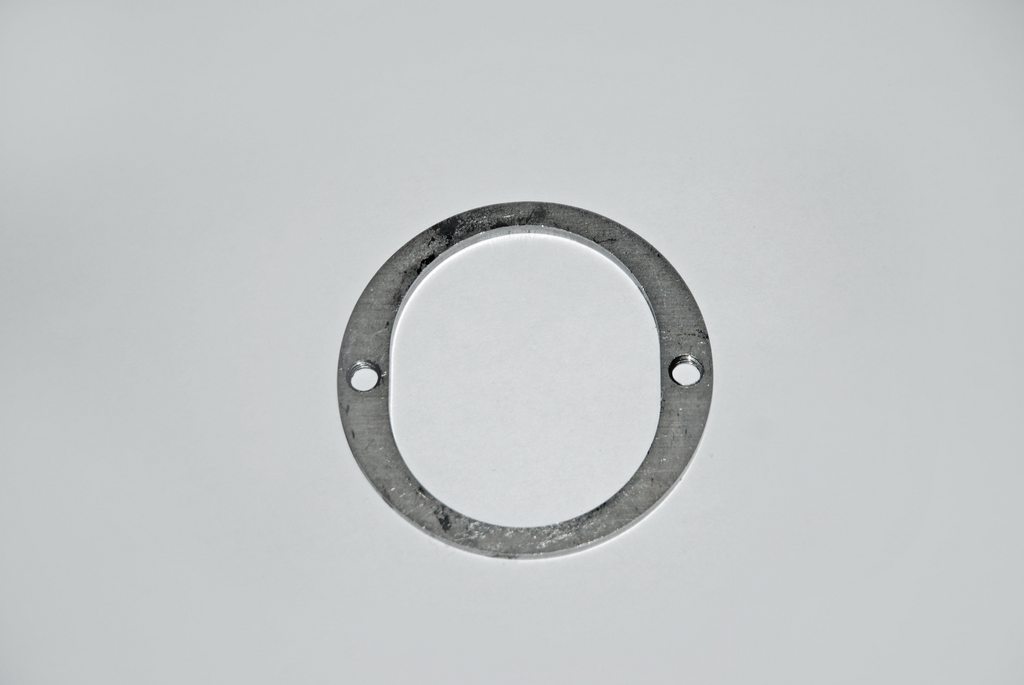 I carefully cut away the pocket on the lower(s) with a die grinder. This is one side of the lower a-arm after I had it TIG welded. The adapter is welded on both sides.  Here's the spring and shock installed:  Does it work? Yes, the front suspension has all sorts of travel. It's as adjustable as I can get it. I'm currently fiddling with the front ride height. It's close now, but I still want to dial it in a bit more. Until next time... Last edited by Arrowsmith; 02-23-2023 at 06:07 AM.
|
| The Following 5 Users Say Thank You to Arrowsmith For This Useful Post: | ||
big gear head (02-23-2023), dykstra (02-23-2023), L78_Nova (02-23-2023), Steve Shauger (03-04-2023), Xplantdad (02-23-2023) | ||
|
#39
02-23-2023, 01:38 PM
|
||||
|
||||
|
Would you share the shock PN's. I have a similarly built (stocker type appearance) small block stick car that I need to upgrade.
Love your build detail and the car!! Thanks for posting up.
__________________
68 Acadian SS-350 auto/AC driver 70 Nova SS-396/375HP Bench Stick 72 Nova SS-350 5sp Mini Tubbed 67 Chevelle Conv. SS-427 clone 70 Chevelle SS-454 LS-5 M-22
|
| The Following User Says Thank You to L78_Nova For This Useful Post: | ||
Arrowsmith (02-23-2023) | ||
|
#40
02-23-2023, 02:34 PM
|
||||
|
||||
|
Quote:
The front shocks are 3840BNC. The back shocks are 3870R1. Fair warning though...don't faint at the $$$. Today, there's almost $2,000 in a set by the time you're done (yikes!). But they are well worth it. Fabulous shocks and super easy to adjust.You might want to talk to AFCO about valving for your application. They have two different sets of BNC (Big Nose Compression) valving for the fronts, plus they can supply different shock lengths for the back, depending upon ride height.
|
| The Following User Says Thank You to Arrowsmith For This Useful Post: | ||
L78_Nova (02-23-2023) | ||
|
|
|


 Linear Mode

