
|
|
|
|||||||
| Register | Album Gallery | Thread Gallery | FAQ | Community | Calendar | Become a Paid Member | Today's Posts | Search |


|
|
|
Thread Tools | Display Modes |
|
#41
 02-25-2023, 12:47 AM
|
||||
|
||||
|
This won't be a super long post. Just catching up with some loose ends of the build (chassis):
At the rear, I used a Detroit Speed front Delrin bushing arrangement. The way it's built (with the step on one side), you can move the spring in ever so slightly. Camaros and Novas of this era were built with springs that were splayed. By slightly moving the spring on the front bushing, you can pick up a tiny amount of extra tire clearance. The limitation is the actual spring perch in the housing. Move the spring too much and of course, it won't fit the housing. This the bushing from Detroit Speed (note the flush mount zerk). It's a nice piece:  Even though the car was a low miler, I still went through the steering components. I added a set of Hotchkiss tie rod sleeves too. They just make wheel alignments easier for folks like me who perform the task at home.   I built a completely new set of brakes, front and rear. At the rear, I had to cut the original drums off the car. The reason was someone previous to me totally messed up the adjusters. It was impossible to back them off and consequently, no easy way to remove the drums. I was hoping to save the backing plates, but in the process I nicked them with an angle grinder/cutoff wheel combination. Parts came from various sources, but the backing plates and drums are from Inline Tube. BTW: There are some differences in backing plates and drums. Some aftermarket backing plates do not have access for knockout plugs (!?). I wasn't crazy about that idea, hence the Inline Tube parts.  Here's a photo of the back brakes with a drum installed. When installing drum brakes with Mark Williams big axle bearings, the ID of the backing plate has to be enlarged. On the drum side, everything fits without modification. Those are 1/2-inch wheel studs from M-W and yes, they fit under the dog dish hubcaps.  In some previous cars, I built them with aftermarket front brakes. The trouble with most of them is they won't fit a stock steel wheel (at least without mods or spacers). The other disadvantage is service parts. With stock brakes, I can get service parts almost anywhere. So. for this car, I used made-in-USA two piece rotors and a mix of reproduction and replacement parts. One word of caution: I painfully discovered that dust caps and castle nuts from some aftermarket sources (Chinese I'm assuming) don't fit. The dust caps and the castle nuts are simply built wrong. For example, when you install the dust cap, it actually contacts the washer and then pushes the bearing back further onto the spindle. Fortunately I discovered this early on. By the way, the OEM drum brake pieces I had worked perfectly. Once I had the "bugs" worked out, it all functions correctly. Additionally, you can see some of the chassis fasteners in this photo. I mentioned this before but I replaced all of the hardware with phosphate plated pieces. 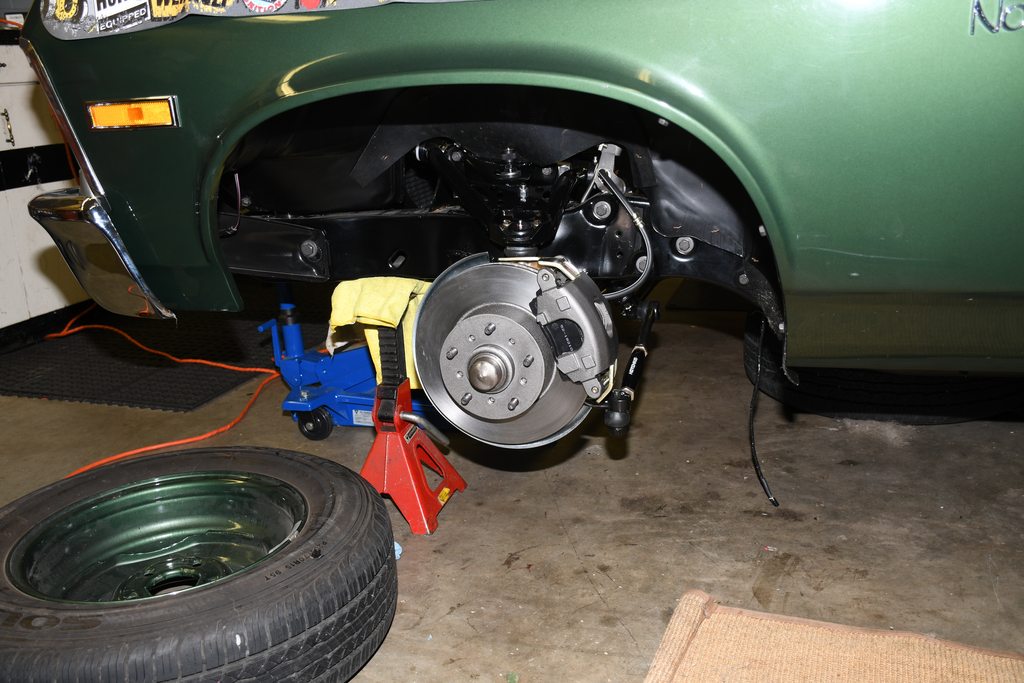 Out back, I had Wheel Vintiques make up a set of 15X8-inch OE-style wheels with a 5-1/4-inch backspace. They took forever, but they finally finished them. Once in hand, I had them painted to match the car and mounted a set of M&H Racemaster P275-60R15 drag radials. They tuck in nicely under the car:   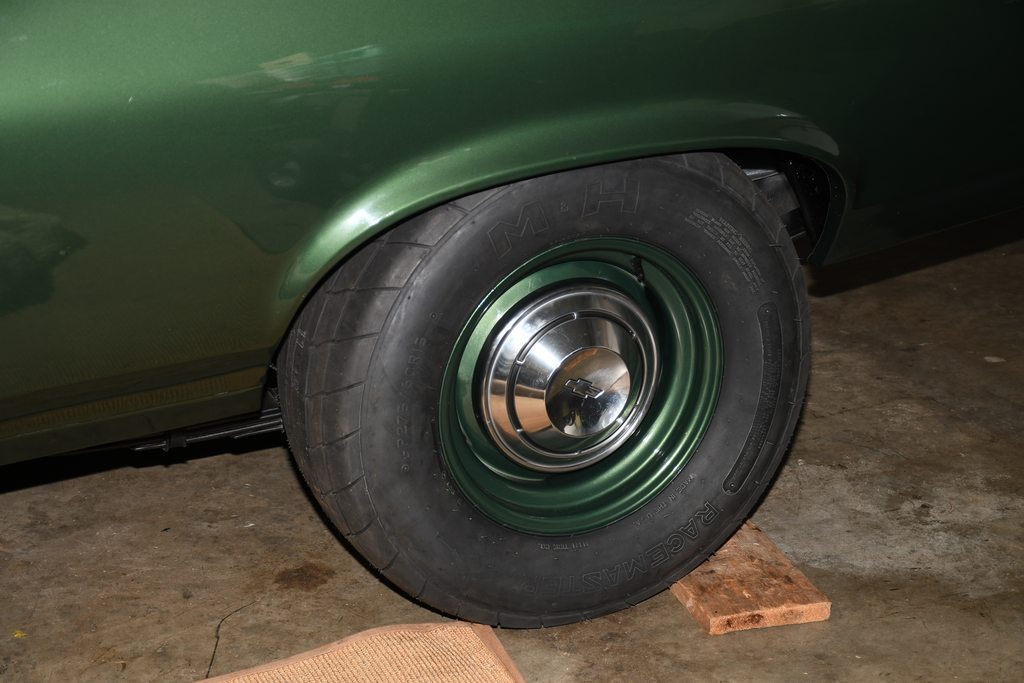 That's all for now... Last edited by Arrowsmith; 02-25-2023 at 12:51 AM. 
|
| The Following 8 Users Say Thank You to Arrowsmith For This Useful Post: | ||
big gear head (02-26-2023), CamarosRus (06-27-2023), dykstra (02-25-2023), jer (03-05-2023), L78_Nova (02-25-2023), olredalert (02-25-2023), Steve Shauger (03-04-2023), Xplantdad (02-25-2023) | ||
|
#42
02-25-2023, 01:17 AM
|
|||
|
|||
|
Detail, detail and more detail. I could sit back and just watch this build forever.
Must admit, I can't wait until the first cruise video, it will be a hoot. Paul
|
| The Following User Says Thank You to CamaroNOS For This Useful Post: | ||
Arrowsmith (02-25-2023) | ||
|
#43
02-27-2023, 09:29 PM
|
||||
|
||||
|
More from the build:
I really don't care for rubber floor mats in cars. Just don't like the look or feel, plus it seems to me they have more of a tendency to trap condensation when compared to carpet (my opinion only!). So I decided to sell the mat from Plain Jane and replace it with carpet. I had to buy two different carpet sets. I had pretty good luck with a previous OER carpet set, so I bought another. Mistake! It fit like crap. And it looked worse. The tunnel area was triple XL. I took it out and replaced it with a set from ACC. The product was great. Ditto with the fit. That duct tape you see on the door sill is to protect the paint while the bench seat is wrestled out and back in: 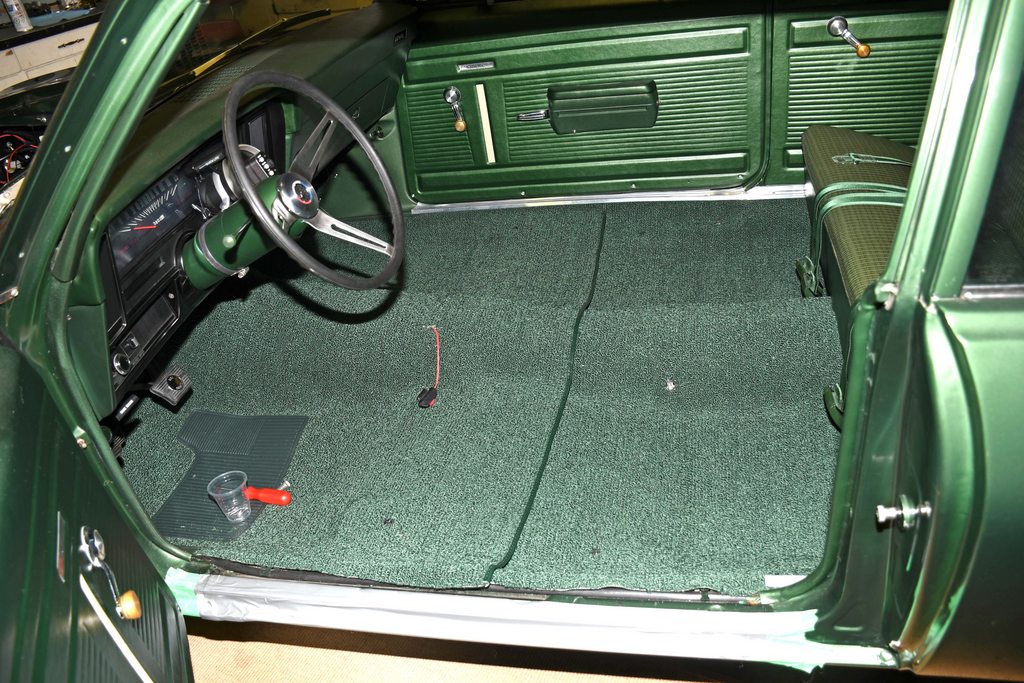 Next up, it was time to get working on the engine. Unfortunately, a huge number of the parts I needed were "supply chain issue" back ordered. It took the better part of a year to acquire a Dart cylinder block. What to do? I decided to use a mock up block and fit as many accessory pieces as possible. Turned out to be a really good plan. Here's the mockup block in the car:  You might notice in some of the pix that I used a conventional motor mount on the passenger side. On the driver side, I use a solid mount. This does the same thing as a turn buckle, but without the drama. The solid mount I use is from Moroso (and don't believe their catalog for fit either...I went through a couple of different sets in order to get the right ones):  I installed the heads and an intake on the mockup block. It sure looked like the Weiand intake I had would work. I later found out it didn't quite clear the flat hood, but that's another story.  Here's another look. I plumbed the mechanical pump (shown here), but that too has changed.  Using a mockup allowed me to check for valve cover to wiper motor clearance. I also used the mockup to figure out which throttle cable to use. Since the Nova was originally a six, it had a cable instead of a lever (that's the six banger cable shown here). Although I do have a complete lever style mechanical throttle assembly it made more sense to use a cable. IIRC, a Chevelle cable worked.  This is the oil filler cap I'm using on the cast valve cover. It's a knurled screw-in job sealed with an o-ring. The valve covers are actually for a marine application.  I don't use a PCV on the engine. Instead, I use two large K&N breathers. These circle track style "socks" are used to soak up any oil that happens to get by the billet baffles in the valve covers:  I test fit the ignition wire divider stands at the same time:  With the mockup engine out of the car, it was time to fit the ignition wires. The valve covers were powder coated black. One change I made later was to reverse the valve covers because the breather on the driver side can interfere with valve cover removal (it hits the wiper motor). FYI, the water pump is an Edelbrock "long" version.  I ended up with custom 2.25-inch primary tube headers from Lemon's Headers. I initially tried a set of Hooker adjustable, but because of the raised exhaust ports in the Brodix BB3 X'tra heads, they just didn't fit. The Lemon's headers were super costly, but they fit nicely. Eventually, I had them Cera-coated semi-flat black (Jane is pretty much allergic to shiny stuff ....L-O-L and the gun finish works great)  Here's the collector and reducer I'm using. I had a v-band clamp setup TIG welded to the slip on reducer. Not shown...when using a slip-on reducer, I always pin it to the collector. Just a wee bit of insurance. By the way, that's a four-inch diameter collector.  This is a side view of the wires, as I was making them up. The wires consist of Summit Racing race wire (which is actually high end Delphi race wire). The sleeves and shrinks are from MSD. The boots and terminals are Delphi (again Summit branded).  Here's a look at the topside. That's a heavily reworked Delco point triggered distributor, complete with a modified vacuum advance. Down the road I'll show you what's inside. It's crowded up there with the fat wires and sleeves, but it all works: 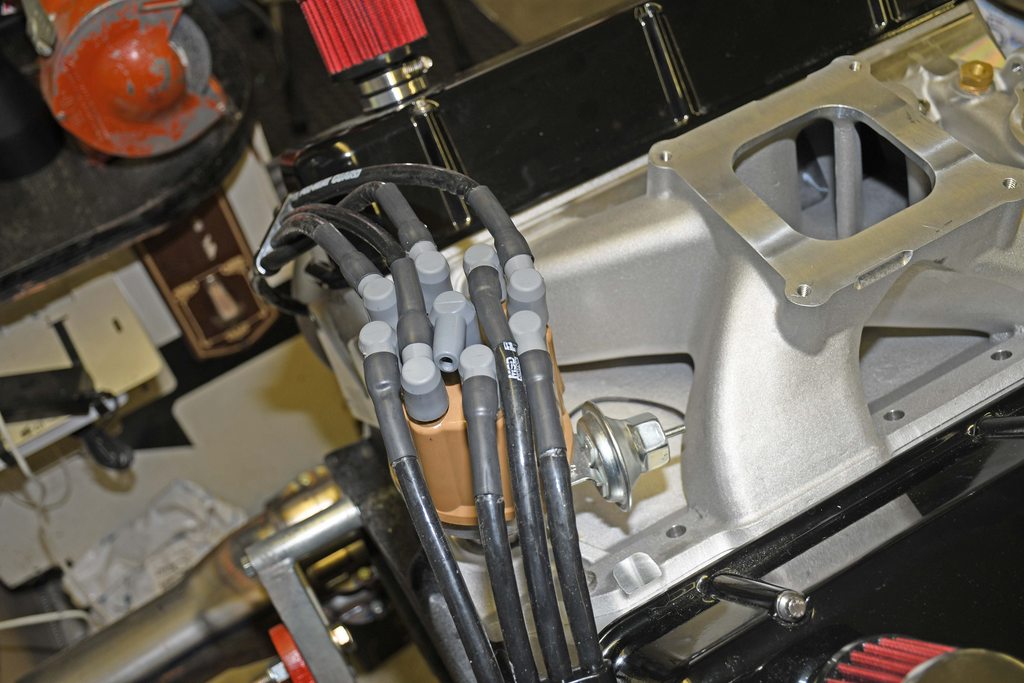 I tested each wire after it was stripped and then after it was terminated. Testing them before hand tells you in a heartbeat if you made a secure crimp!  That's all for now...I'll gather more pix in a few days... Last edited by Arrowsmith; 02-27-2023 at 11:25 PM.
|
| The Following 8 Users Say Thank You to Arrowsmith For This Useful Post: | ||
69M22Z (03-12-2023), big gear head (02-27-2023), dykstra (02-28-2023), L78_Nova (02-28-2023), olredalert (02-28-2023), Steve Shauger (03-04-2023), Tenney (02-28-2023), Xplantdad (02-27-2023) | ||
|
#44
02-27-2023, 10:46 PM
|
||||
|
||||
|
Awesome...and those headers are a work of art!

__________________
Bruce Choose Life-Donate!
|
| The Following 3 Users Say Thank You to Xplantdad For This Useful Post: | ||
|
#45
02-27-2023, 10:55 PM
|
||||
|
||||
|
And they cost almost as much as a small car…L-O-L. Seriously though, the fit is great. In some places, like between the driver side pipes and the motor mount frame stand, there’s room for a sheet of paper. I’ll use Lemons again!
Last edited by Arrowsmith; 02-27-2023 at 11:12 PM.
|
| The Following 3 Users Say Thank You to Arrowsmith For This Useful Post: | ||
|
#46
02-27-2023, 11:14 PM
|
||||
|
||||
|
One of the best and most detailed builds on the site! Kudos Wayne!!
__________________
https://www.youtube.com/watch?v=gkDf7PPRzJ0
|
| The Following User Says Thank You to BJCHEV396 For This Useful Post: | ||
Arrowsmith (02-27-2023) | ||
|
#47
02-28-2023, 12:12 AM
|
|||
|
|||
|
"Even though the car was a low miler, I still went through the steering components. I added a set of Hotchkiss tie rod sleeves too. They just make wheel alignments easier for folks like me who perform the task at home."
Not only that, they don't flex as much as the factory adjusting sleeve.
__________________
Don't believe everything you read on the internet ... Ben Franklin
|
| The Following User Says Thank You to Lynn For This Useful Post: | ||
Arrowsmith (02-28-2023) | ||
|
#48
03-04-2023, 01:42 PM
|
||||
|
||||
|
Any more updates Wayne? We need our "fix"! Lol.
__________________
https://www.youtube.com/watch?v=gkDf7PPRzJ0
|
| The Following 2 Users Say Thank You to BJCHEV396 For This Useful Post: | ||
dykstra (03-04-2023), Steve Shauger (03-04-2023) | ||
|
#49
03-04-2023, 03:41 PM
|
||||
|
||||
|
Quote:

|
| The Following 3 Users Say Thank You to Arrowsmith For This Useful Post: | ||
|
#50
03-04-2023, 09:18 PM
|
||||
|
||||
|
I'm back L-O-L
The original plan was to build a 540, so a block with a 4.50-inch bore was what I was looking for. I have a lot of friends and connections in the biz (including heavyweights like David Reher), and none of them could come up with or give up a block. I was on the phone almost every day for six months trying to find a block. I was pretty much convinced there was little hope of finding one because of the supply chain issues we were all facing. One day I tried Borrowski Race Engines in Rockdale, Illinois. Much to my surprise, they had one (1!) 4.6-inch bore block available. I asked him to hold it while I called my piston manufacturer of choice (Mahle Motorsports). Mahle told me they had one (1!) set of 4032 alloy, low dome pistons for a 4.6-inch bore block available, so it all fell together. Borrowski has a Rottler machining center setup for blocks, so I asked them to run my block through to my specs. Fed Ex managed to lose the block in transit, but eventually I took delivery. Here's the bare block before final cleaning:  I cleaned it several times (Borrowski also cleans it) and then started the assembly, beginning with prep work like plugs, block drains, dowels, etc. You can see I use rad petcocks on the block drains:  This is my crankshaft of choice: It's a fully counterweighted forged job from Molnar. Tom's a friend and honestly, he does fabulous work. Stroke is 4.250-inches.  I miked the crank, and it was pretty much dead nuts accurate:  Tom Molnar suggested I use bearings from King Bearings (they're out of Israel). Rods and Mains (shown here) are coated. There was another wait because the bearings I needed (standard, standard, narrow rod) were backordered:  Crank is in it here, but as you can see, only the front main and the rear main are in place. I was checking crankshaft end clearance. Look closely and you can see I'm using a billet oil filter adapter, without a by pass. This thing will never see use in cold weather and I don't use super heavy oil, so....  These are the Mahle Motorsports pistons I'm using. They have a 1.270-inch compression height, a 10-cc mini dome, and they're machined for relatively skinny metric rings (1.5-mm top and second; 3.0-mm oil). The pistons are dry phosphate coated to prevent ring micro-welding and pin galling during initial startup. Mahle includes proprietary Grafal anti-friction coating to the piston skirts: 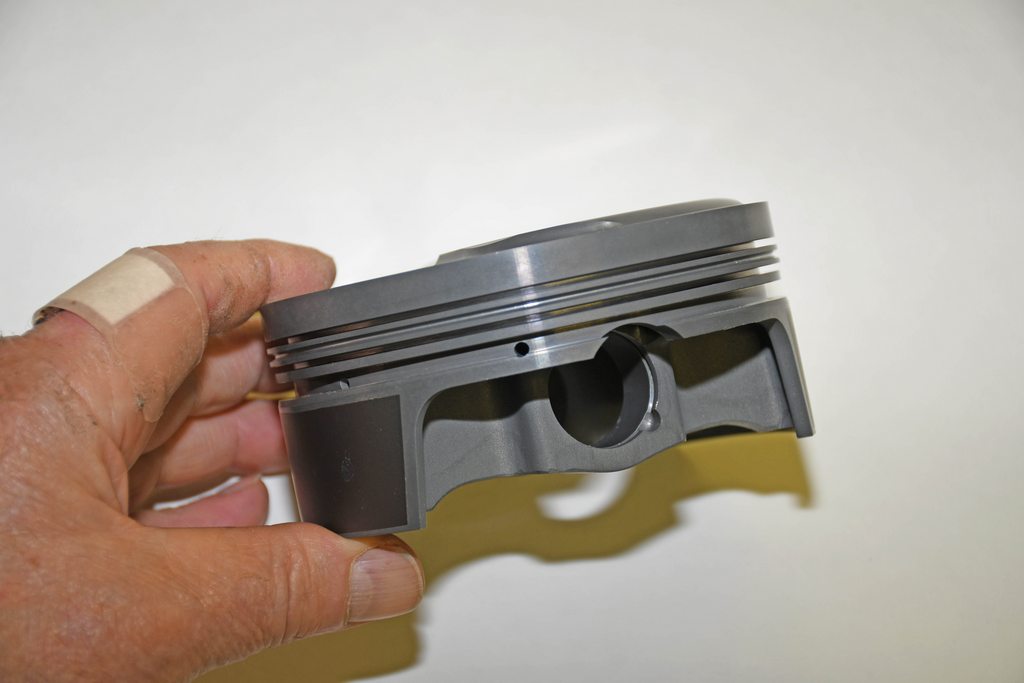  Pins are conventional 0.990-inch jobs. Retainers are round wire (which are slightly less painful to assemble than Spirolocks). The pistons are setup so that you can get a little screwdriver in place to work the retainer.  Rods also came from Tom Molnar. They're 6.385-inches center to center and obviously set up for a floating pin:  Tom designed his own thread configuration for the rod bolts and has ARP build the rod bolts for him:  I file-fit all of the rings by hand to set the end gap for each cylinder. I don't have (and cannot justify) one of the super fancy, super expensive electric ring filing tools out there so I use this tool from Summit Racing. Compared to other hand ring filers, this one works fabulously: 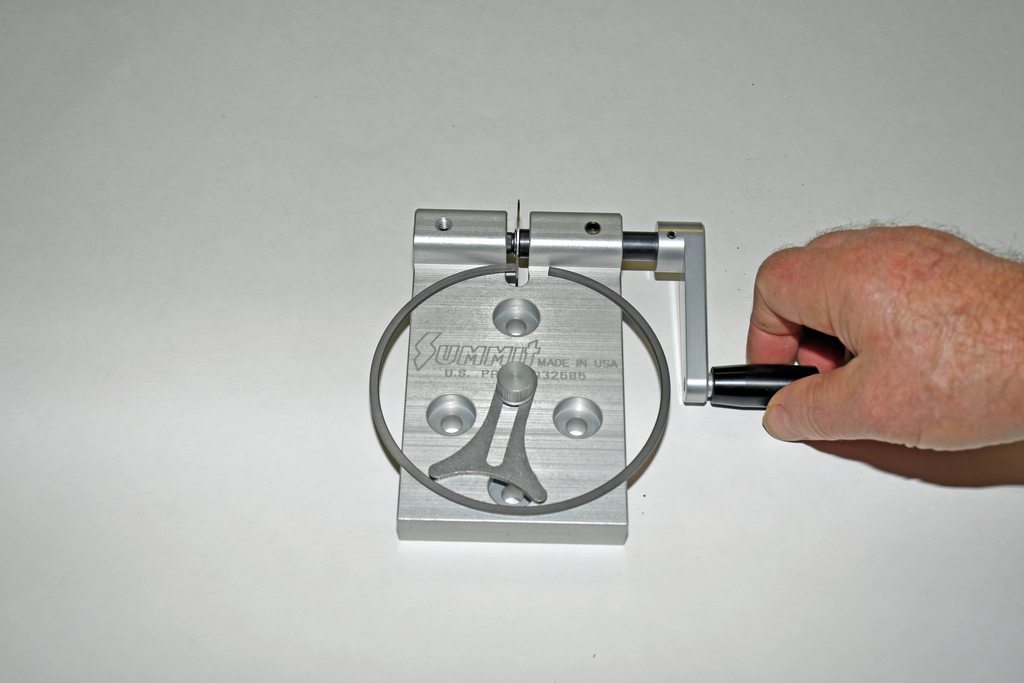 A big part of the process is "sneaking up" on the gap. In other words, file a little bit and check the gap, repeat, repeat, repeat for eight top rings and eight second rings...it takes awhile...L-O-L:  During the pre-assembly phase, I don't install the rings on the pistons or the pin retainers. I do that after the engine is balanced. In the pre-assembly phase, I tape the ring lands with a couple of wraps of painter tape to protect the various bits and to keep the pins in place. Nothing new here. Lot's of race engine builders do the same thing:  It was time to degree the camshaft. Here I'm using a piston stop to establish true top dead center:  Here's the timing chain setup I'm using. It's an Australian Rollmaster. As you can see on the crank gear, there are a ton of timing options, and my timing set was pretty old (but not used). It came from the old Crane Cams and instructions weren't plentiful. It took some messing around to get it dialed in. Once the engine was final assembled, I used a roller cam button and cam bolt lock on the nose:  I'm using a large diameter degree wheel from B&B Performance. My old acquaintance Joe Stef (Stef's Oil Pans) owns B&B. Joe is a member here, and his company products are stellar. By the way, the camshaft is a mechanical roller from Bullet Racing Cams. I've known John Partridge (owner of Bullet) ever since his days at Lunati and me working on NHRA Stockers. The cam has a lift of...a wee bit more than 0.750-inches on both the intake and exhaust and the duration and lobe center are...I'm not telling...L-O-L. Seriously the roller cam is a big pussy cat in this engine. It now idles at 1100 RPM or so in gear  Just a look at the dial indicator as I'm going through the process...  For the most part I use Mahle gaskets in the engine. The head gaskets are MLS (Multi Layer Steel) configuration. They don't require a hot retorque (which is an absolute pain without a test stand). I like them a lot (a Lot!). The gasket shown is one I had for the 4.50-inch bore 540, and obviously, I couldn't use it here:   At this point, I disassembled everything and took the respective parts in to be balanced. I'll show you more of the build next time around... Last edited by Arrowsmith; 03-04-2023 at 11:48 PM.
|
|
|
|


 Linear Mode

