
Dedicated to the Promotion and Preservation of American Muscle Cars, Dealer built Supercars and COPO cars. |
|
|||||||
| Register | Album Gallery | Thread Gallery | FAQ | Community | Calendar | Become a Paid Member | Today's Posts | Search |


|
|
|
Thread Tools | Display Modes |
|
#51
 03-19-2023, 10:58 PM
|
|||
|
|||
|
I really don't think your losing any power with that dual plane. People have made over 800Hp with GM OEM dual planes. This larger should support at least 850Hp
SMALLER 538 in with ported GM dual plane, 831Hp. https://www.chevelles.com/threads/ho...-plane.354314/ Mine didn't make 800Hp, but we think the stock 1969 "052" alum block is the issue there.
__________________
'58 Apache pick up restomodding with twin turbo 522 '78 Z28 4sp being restored '78 Z28 32,000 survivor, Og Yellow paint, AC. '70 W30 convert TRIBUTE '70 CANADIAN Nova SS396 L78 Pro Street '69 CANADIAN Nova SS 396/350 hp '67 CANADIAN Nova SS 427 10 sec. driver '66 CANADIAN Nova SS Race Car '69 FIREBIRD Tubbed Racecar '61 CANADIAN Pontiac Bubble top 409+/4sp (SOLD) '31 ALL STEEL Chevy P.U. GONE (EX-WIFES NOW) 
|
|
#52
03-21-2023, 01:54 AM
|
|||
|
|||
|
After a considerable wait, my TH400 was eventually shipped from ATI in Maryland. I've used both ATI and A1 Racing automatics transmissions for something like forty years. I knew both of the respective company founders very well. When Jim Beattie passed away, ATI was handed over to to his very capable son JC. Marc Ripes (from A1) on the other hand sold his business. I elected to go with ATI. JC runs a great business!
Anyway, while waiting for the transmission, I decided to install the shifter from Precision Performance. It's a fabulous piece and you'll soon see why... First things first...I mocked it up in the car. I use tape to lay out where it will be, after getting in the car, moving the bench seat around and getting comfortable. 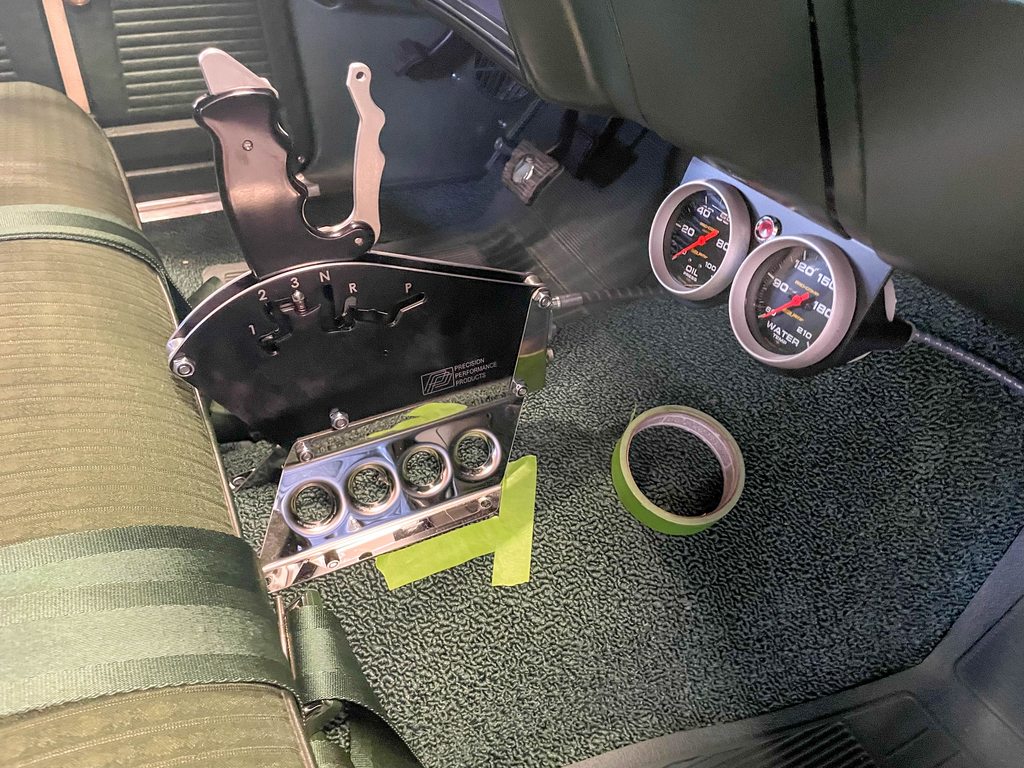 Here's the shift gate. As you can see, it's a forward pattern setup. I prefer forward pattern transmissions on the street. I'll get to that later. With the Precision Performance shifter, once it's in first gear, it operates like a ratchet. When changing upshifting, just keep slapping the shifter forward. When downshifting, you simply pull the lever and the shifter handle simultaneously.  The sliver "button" on the shifter handle is used when you need to go into reverse or park. Meanwhile, the red button is the line lock (roll control) switch. 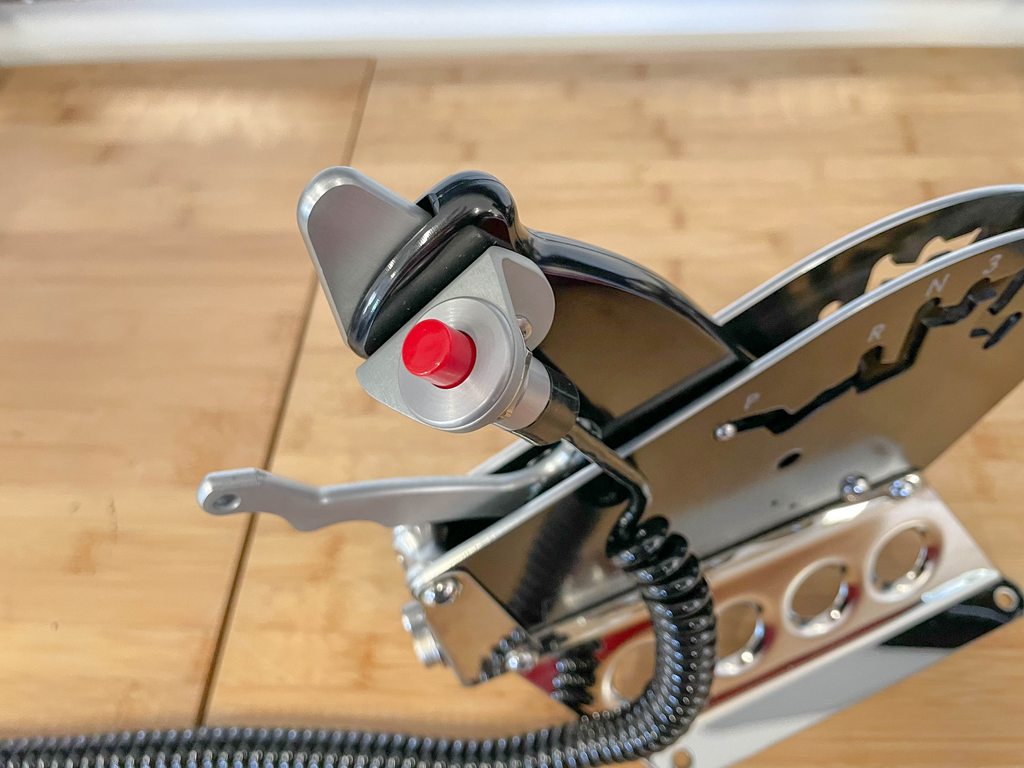 There's a neutral safety switch built into the shifter. I simply wired it into the OEM neutral safety switch in the dash harness. The other wires are for the line lock. Note the mil spec style wire harness connector. 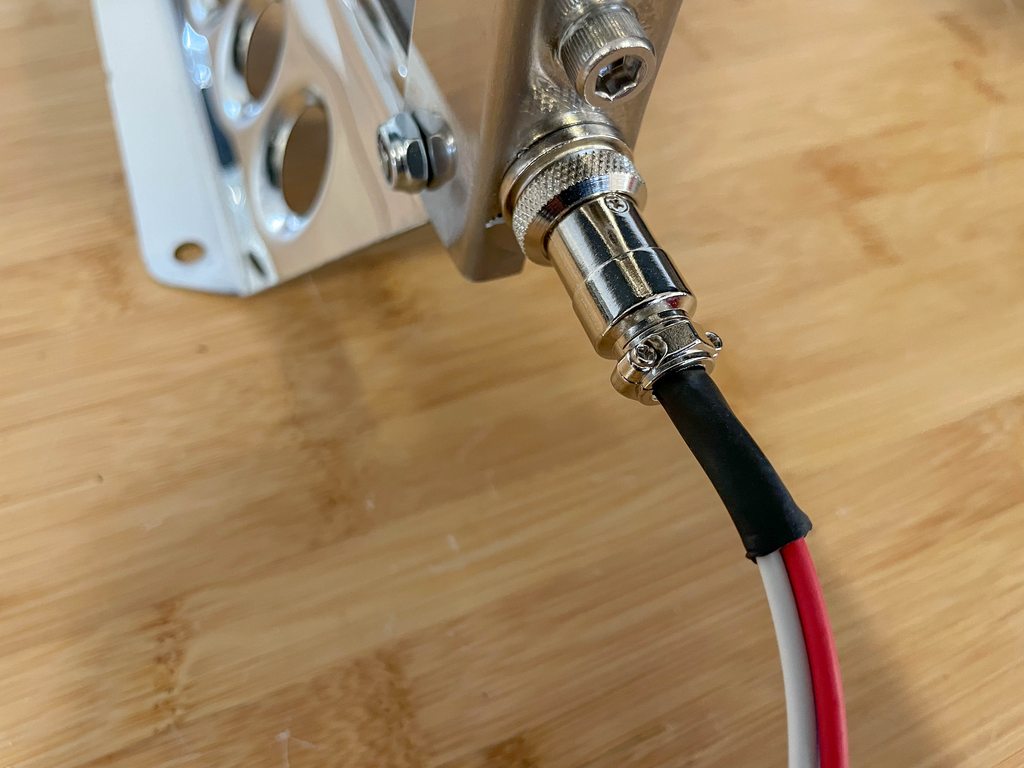 In order to make clean holes in the carpet, I use this (a soldering iron). By the way, a larger job works perfectly for making seat belt and seat mount holes in new carpet too!  Here's the shifter installed. I hate using big screws to hold a shifter in place. They're not secure and they tend to slice and dice my skin if I get too close under the car (  ). I use aircraft AN fasteners to hold it in place (nylocks under the car). I think you can see why plenty of racers use this setup. It's simply awesome. ). I use aircraft AN fasteners to hold it in place (nylocks under the car). I think you can see why plenty of racers use this setup. It's simply awesome.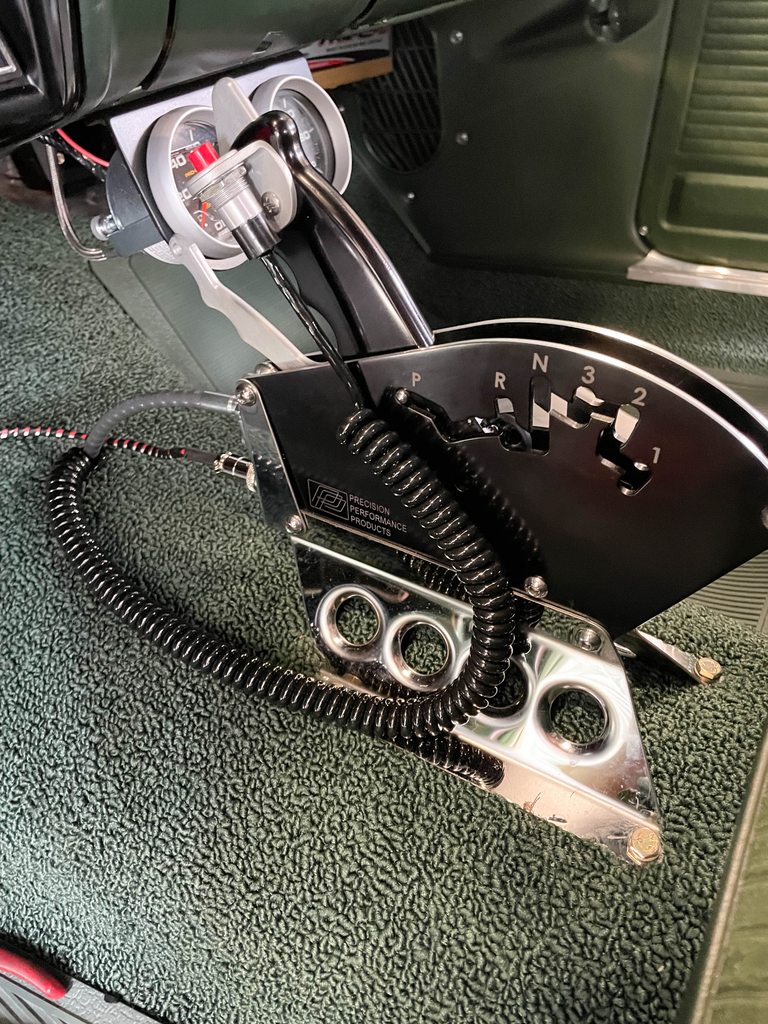 Here's my TH400 from ATI. It too is a piece (!!!). Choices for components were a collaboration between JC and myself. For street use, a forward pattern manual valve body is a good idea. Their reason is, most reverse pattern manual valve bodies do not provide engine braking. ATI's forward pattern manual valve body does. Additionally, it has standard 2.48:1. 1.48:1 and 1:1 ratios. The input shaft is a Vasco steel job and the balance is all heavy duty ATI hardware (too much to list here). The torque converter is a 10-inch Tree Master from ATI. In ancient times, I would have needed to use an 8-inch converter, but technology has marched forward and ATI can make the 10-inch example work perfectly. A long stroke engine helps...L-O-L. And if you've used an 8-inch converter on the street, you'll know it sometimes isn't fun. The flex plate is an SFI-certified piece from ATI. I don't like billet flex plates. The reason is, they don't flex (which they are supposed to do) and that can create all sorts of havoc on a street driven car.  Obviously, the engine and trans must be hooked together and there are some important considerations. Here's how I do it... 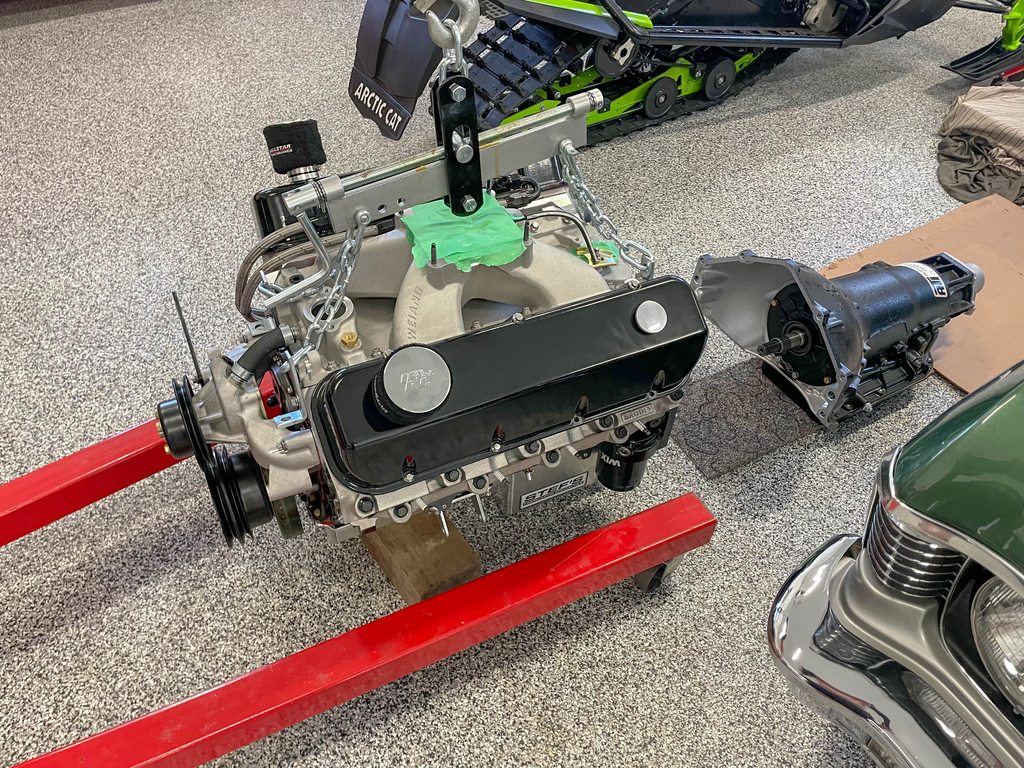 To mount the flex plate on the engine, you have to make sure it's oriented correctly (don't laugh...some get it backwards). I also use ARP fasteners and torque them to spec:  When installing a converter, it's easy enough to get it wrong. Plenty of good mechanics miss it. I use this simple ATI shipping tool to ensure the converter and transmission input splines are correctly engaged. It saves a ton of heartache if you don't get it right.  Another thing folks tend to miss is transmission bolt engagement (often too little). I use ARP 12-point fasteners here, and this photo shows how much thread engagement they offer. 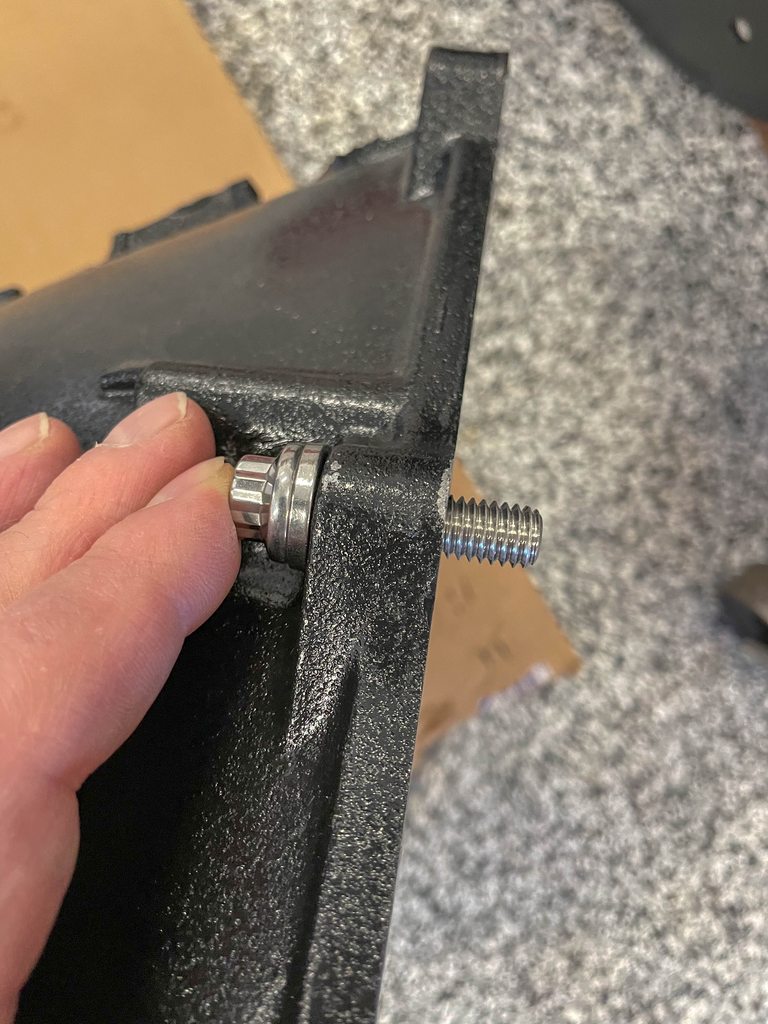 When installing the transmission, you shouldn't draw it to the block by the bolt threads. Once on the dowels, you should be able to move it into place by hand (that's what is going on here):  With the transmission case attached, here's the little dance I do to get the converter bolts installed and get the starter properly shimmed. It ain't pretty but it works...L-O-L:  Here's another look at the starter (Tilton simply builds stellar, no BS parts): 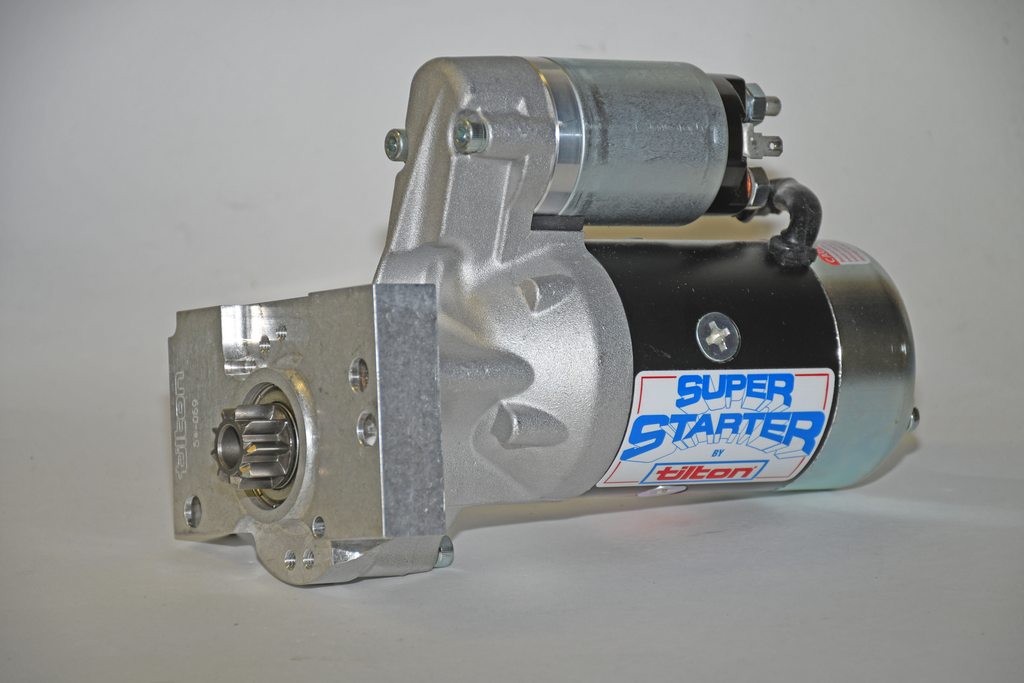 I prefer to use ATI's Grade 8 bolts for the converter (to flexplate). The reason is, a six-point head allows open end wrench access up inside the transmission bell housing. 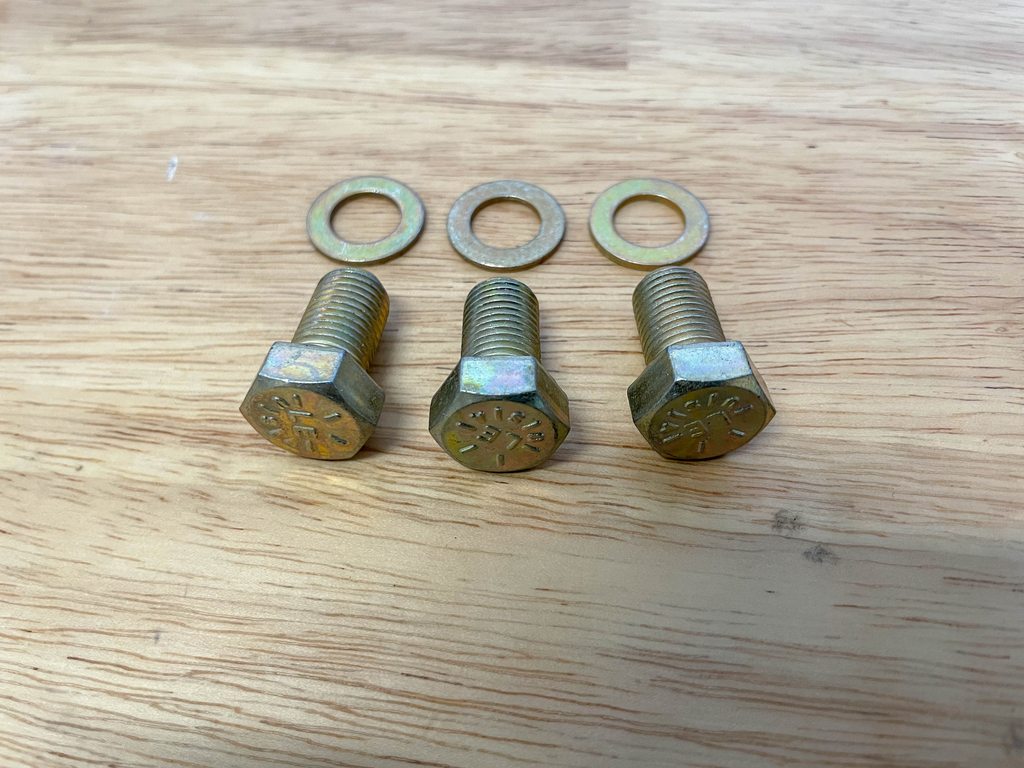 I did this earlier, but I'll it address it now. It's the shifter cable setup on the transmission. It is far easier to get it close to adjustment here and then final adjust after it's in the car. As you can see, Precision Performance uses all top quality components: 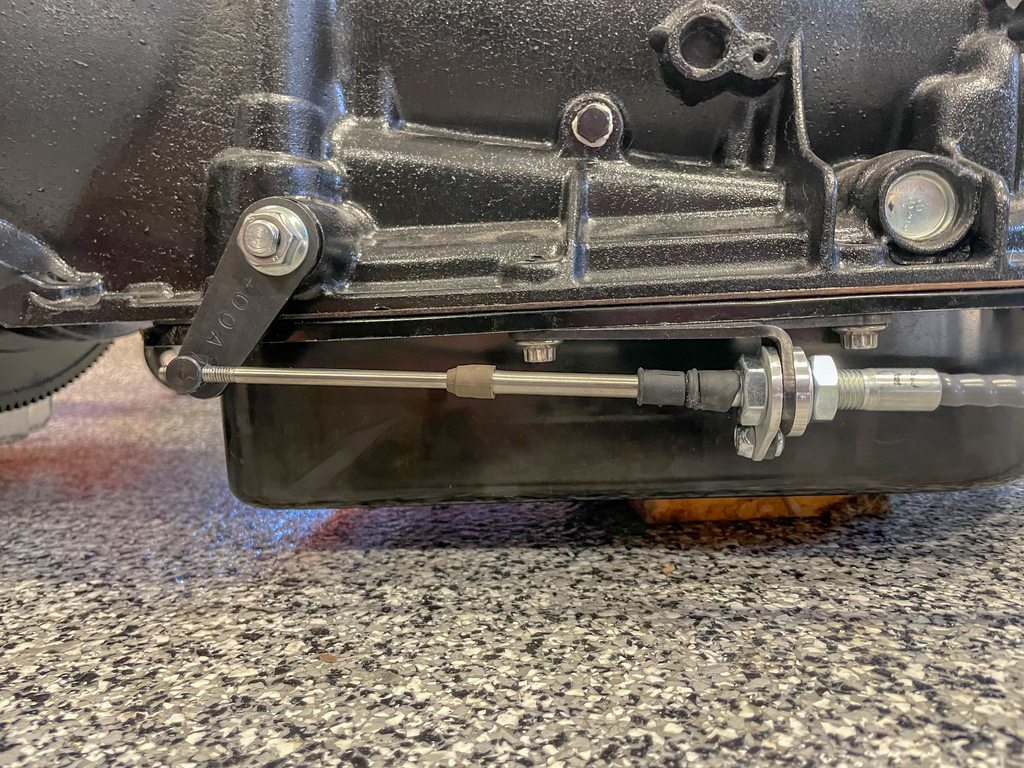 Something small but incredibly important is the transmission dipstick. I use this setup from Dan Masta's Trick Stick company. With this assembly, the dipstick actually locks (NHRA requirement). This prevents it from blowing out, and if you've ever experienced a broken automatic that spews out a dipstick tube (and consequently oils down your back tires), you'll know why it's a great idea! 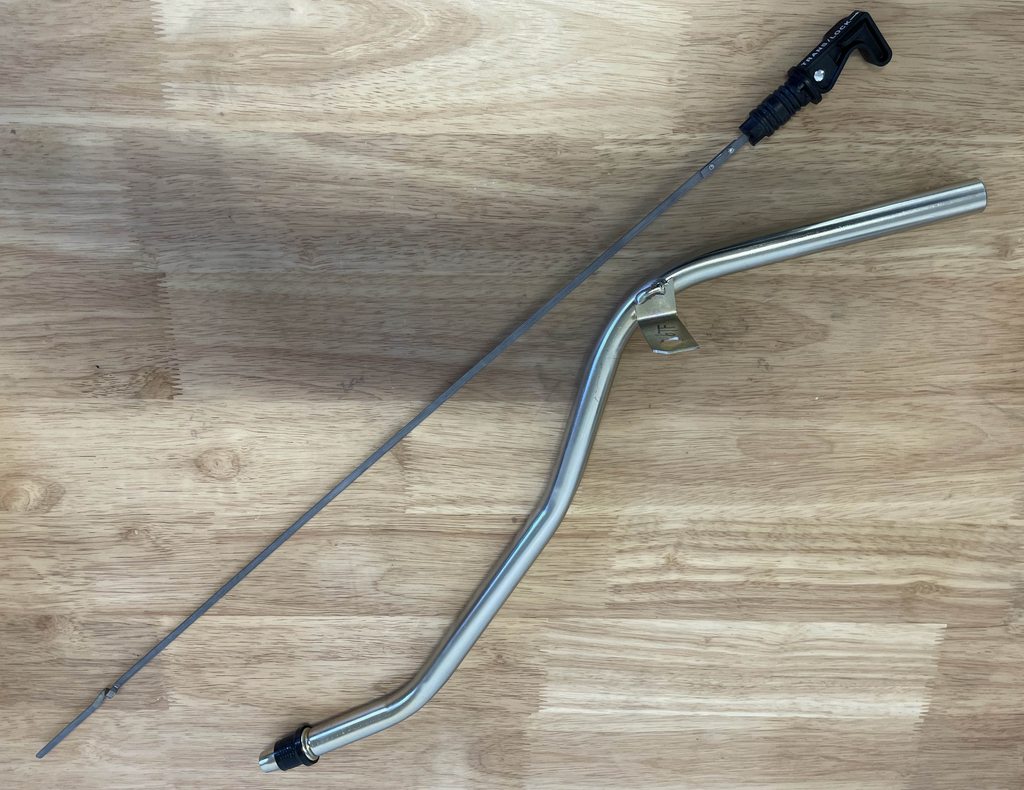 
Last edited by Arrowsmith; 03-21-2023 at 02:13 AM.
|
| The Following 11 Users Say Thank You to Arrowsmith For This Useful Post: | ||
69M22Z (03-21-2023), big gear head (03-21-2023), BJCHEV396 (03-21-2023), dykstra (03-21-2023), L78_Nova (03-29-2023), L_e_e (03-21-2023), markinnaples (03-21-2023), olredalert (03-21-2023), PeteLeathersac (03-21-2023), Tenney (03-21-2023), Xplantdad (03-21-2023) | ||
|
#53
03-22-2023, 12:33 AM
|
||||
|
||||
|
Awesome build Wayne! Do remember how long you made the advance slot in your distributor? I recently restored a Delco distributor for my 496 and shortened the advance slot with a dab of weld followed by some filing. The stock 327/210hp distributor gave it 28* of advance! Now I have half that.
|
|
#54
03-22-2023, 01:21 AM
|
|||
|
|||
|
Hi Chuck. I just used an oversize limiter bushing and didnt touch the slot. I might go back in and limit the mechanical a bit more (not as much as your setup though)
and then add more initial. The original plan was to run a stick, and because of that I have more mechanical advance in it (and less initial). On the other hand, my 565 does really run nicely the way it is, so I just might leave it alone.😉
|
| The Following User Says Thank You to Arrowsmith For This Useful Post: | ||
Chuck_Burg (04-11-2023) | ||
|
#55
03-25-2023, 10:01 PM
|
|||
|
|||
|
Getting closer to done.....
Here are the headers I used: They're custom headers from Lemons' in California. The headers are a slip fit design (each pipe slips into the collector and the flange is split). This allows getting them into the car with a wee bit more ease. The primary tubes are 2.25-inches in diameter while the collectors are 4.0-inches.  Dan Lemons does fabulous work. Here's the TIG welding on the primaries: 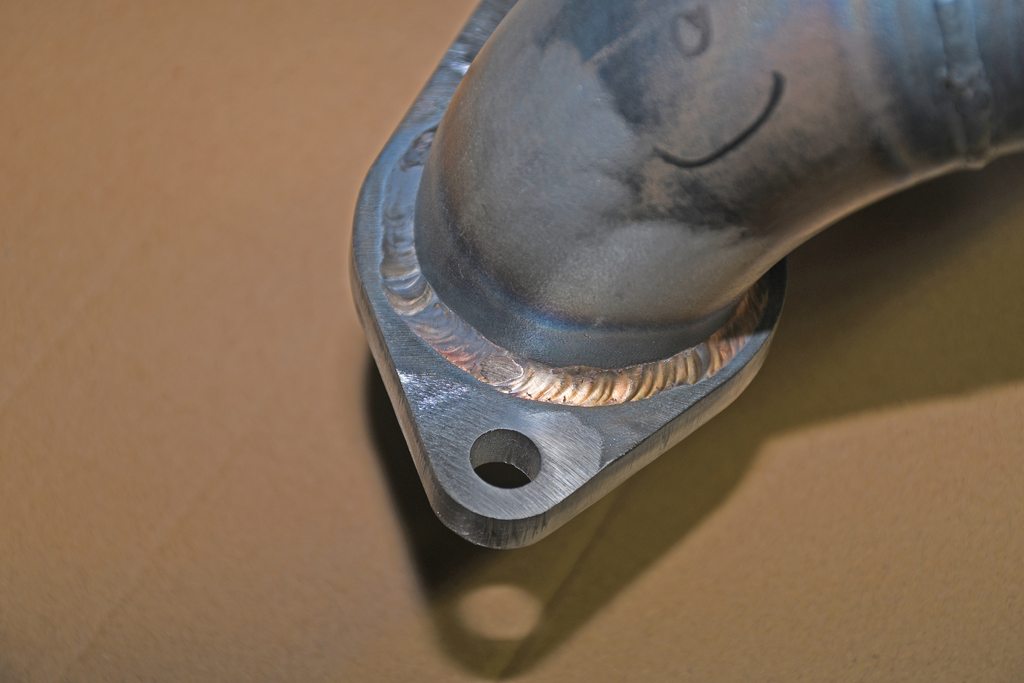 Inside the tube, you can see the same attention to detail:  The collectors incorporate an exhaust gas transition spear: 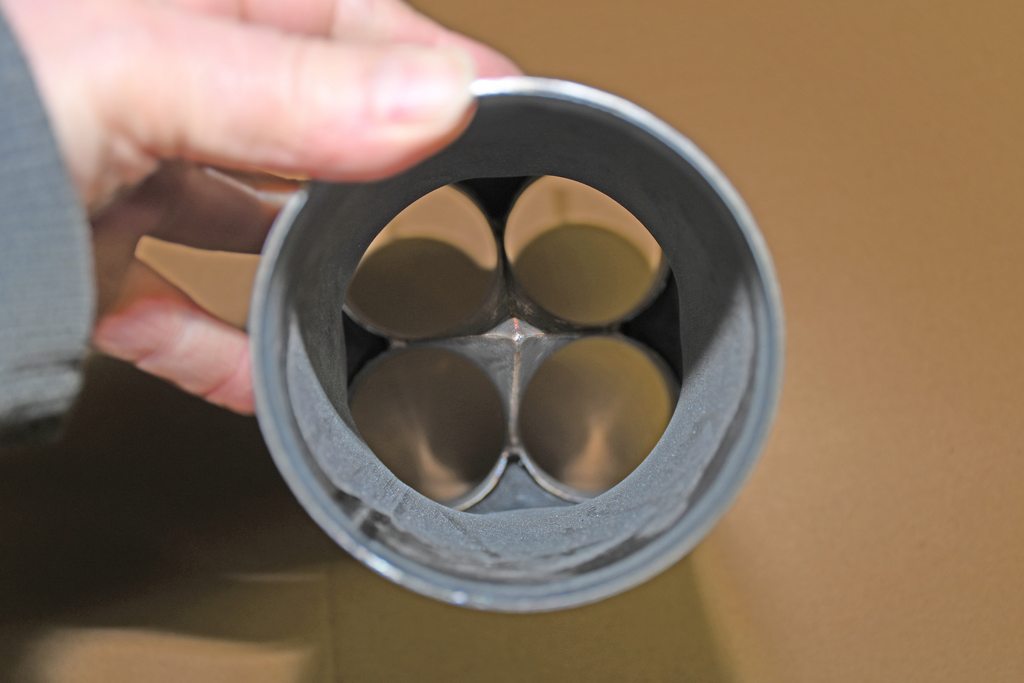 I really struggled with what to coat them with. I've found that some of the coatings out there don't live. Also, after a lot of hand-wringing, I decided to mute the coating colour so as to match the understated theme of the car. After a bit of research I decided to use a Cerakote process. It's used on custom guns and rifles, and certain mixes have the heat capacity for headers. To get there, the local shop asked me to clean the header parts: 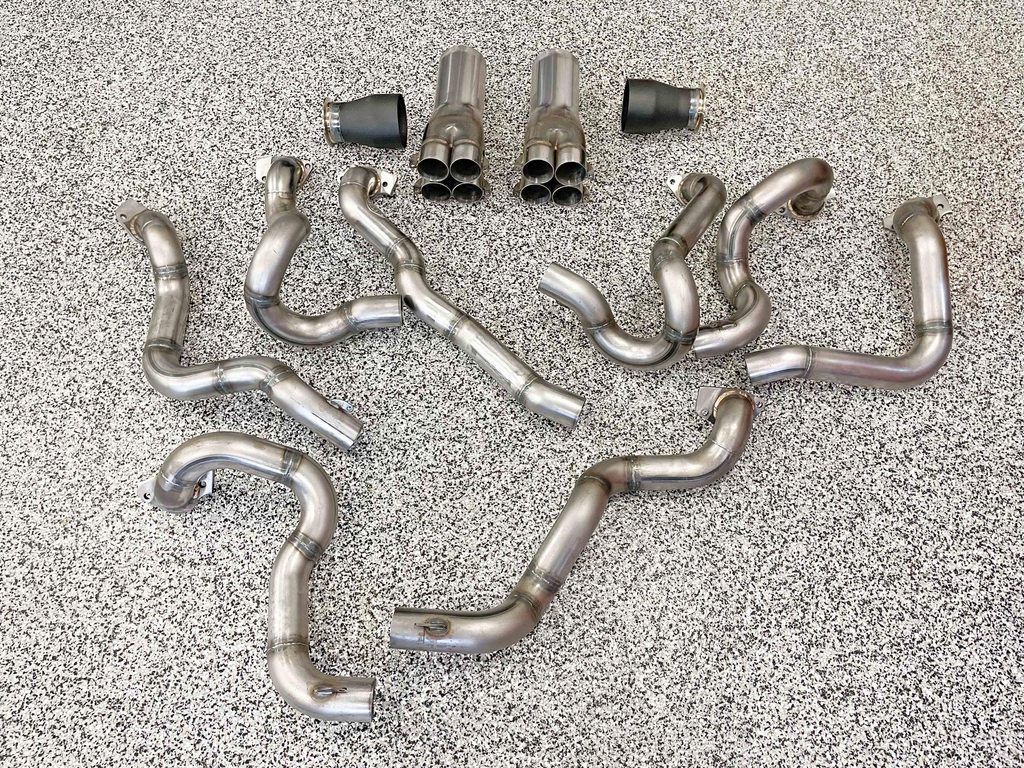 I never saved any "after" shots of the finished headers but you can see the almost flat black I selected in some of the other images of the car. Moving back in the exhaust I incorporated V-band clamps to hook the 4-inch to 3-inch reducers to the exhaust. 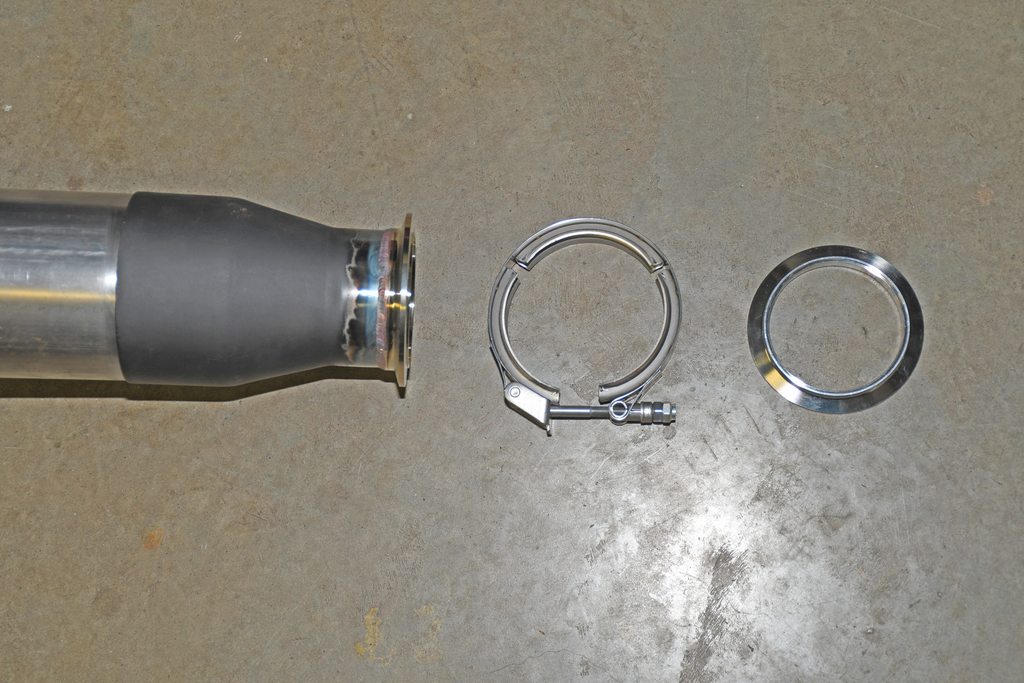 Out back, I used these hangers from Stainless Works. They attach to the longer-than-stock rear seat belt bolts I installed. Not shown here is the clamp I used. Instead of the clamp shown, I went with a beefier stainless steel u-bolt setup. 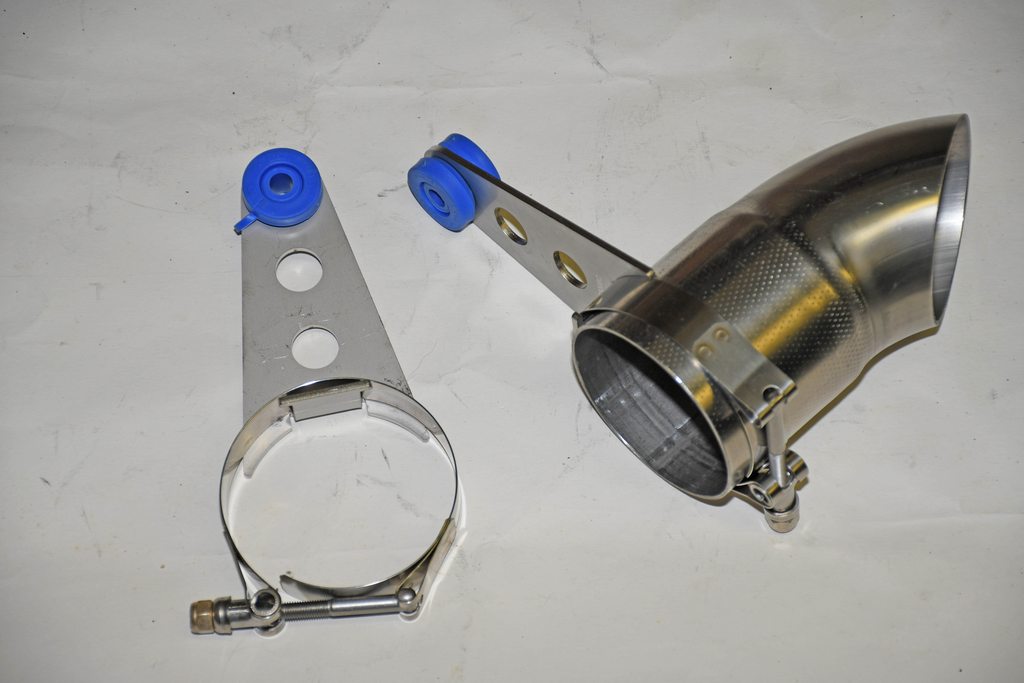 I made a set of turnouts from 3-inch stainless and they were TIG welded directly to the Hooker mufflers: 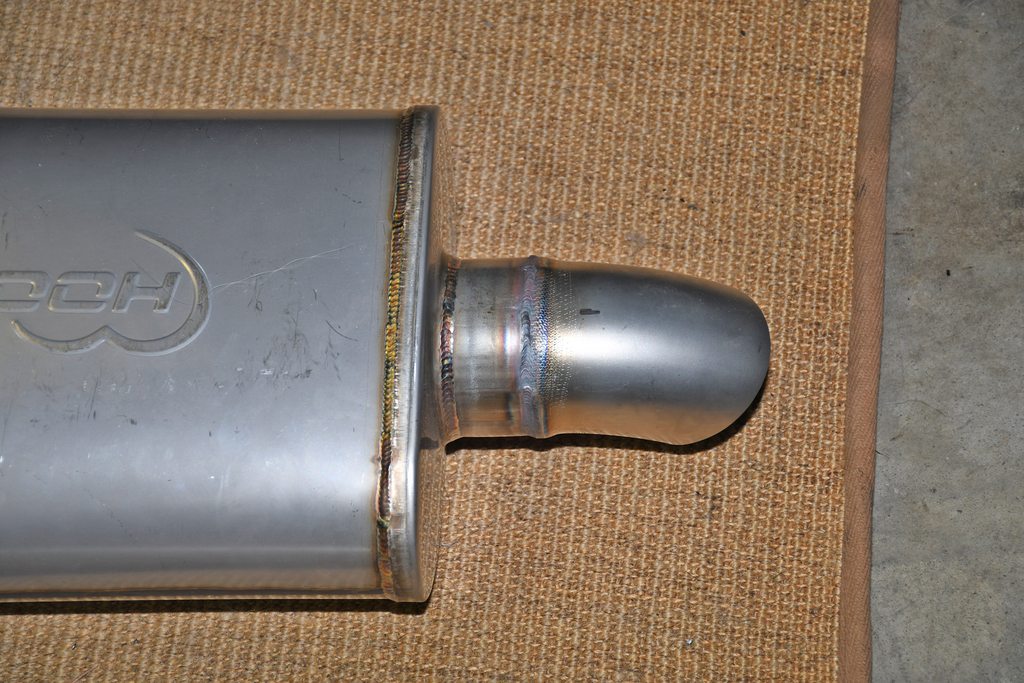 This is a look at the exhaust before I modified the head pipes to fit. The system has 3-inch pipes and of course a cross-over. Hooker Headers makes it for LS swaps. I have three different sets of mufflers on hand and I picked what I thought would be the quietest. And it really is subdued, even without tail pipes (which I cannot run with the rear suspension and the mount location required for the large electric fuel pump I have on the car). 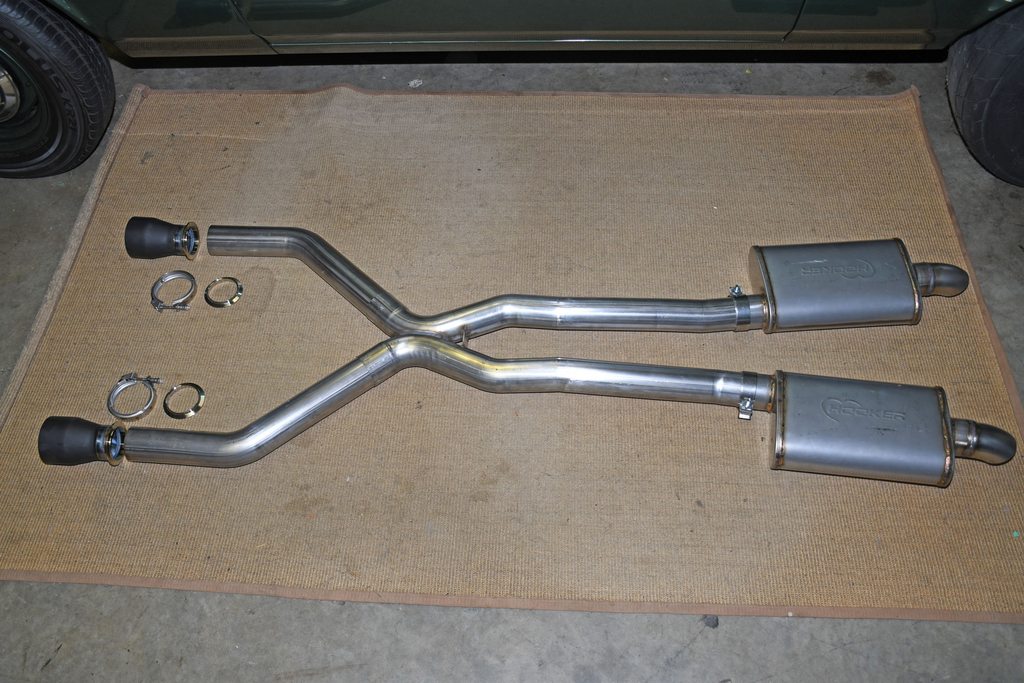 The final big piece under the car is the driveshaft. I had Mark Williams build me a custom 3-1/2-inch diameter job from 7075 aluminum. FYI, many years ago, I tested a conventional steel shaft against an aluminum shaft in a NHRA Stock Eliminator car. With back to back to back A-B-A testing, I discovered the aluminum shaft was definitely quicker (bad alas, not NHRA legal for the application....L-O-L). Too bad no one can see this M-W shaft hidden up inside the car. It's a work of art: 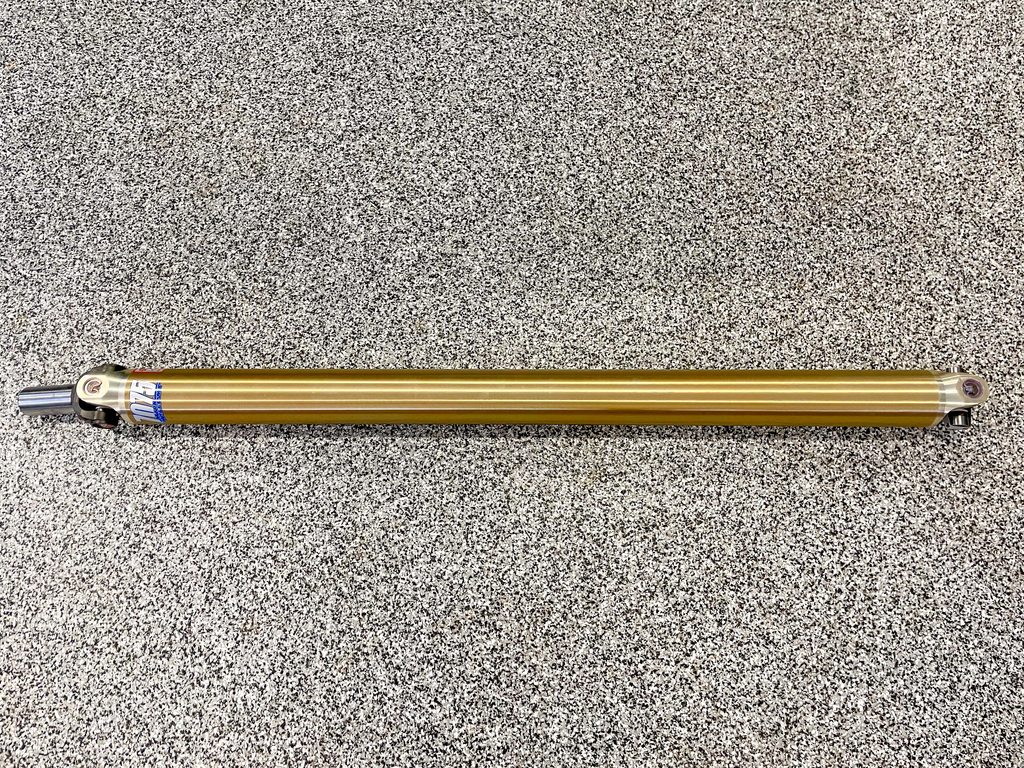 M-W built the billet steel slip yoke for the TH400. I use solid (no zerk) Spicer 1350 universal joints front and rear. The driveshaft yoke isn't welded. The reason is, you can't easily weld 7075. Williams invented a bonding system to install the pair of "weld" yokes on the shaft. The strength actually exceeds that of a conventional welded (non-7075 alloy) shaft. 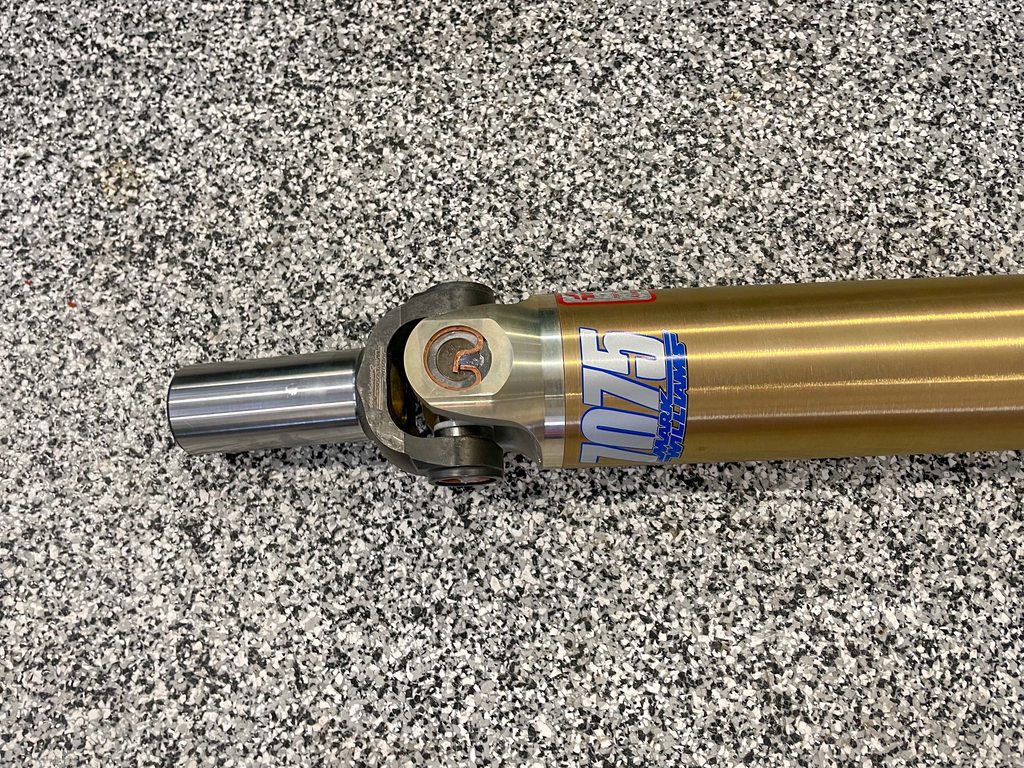 The rear of the shaft is the same -- Spicer 1350 u-joints and an "Accubonded" yoke. Williams high speed balances the shafts, and for my application, the critical speed is just about perfect for the RPM range of the car. 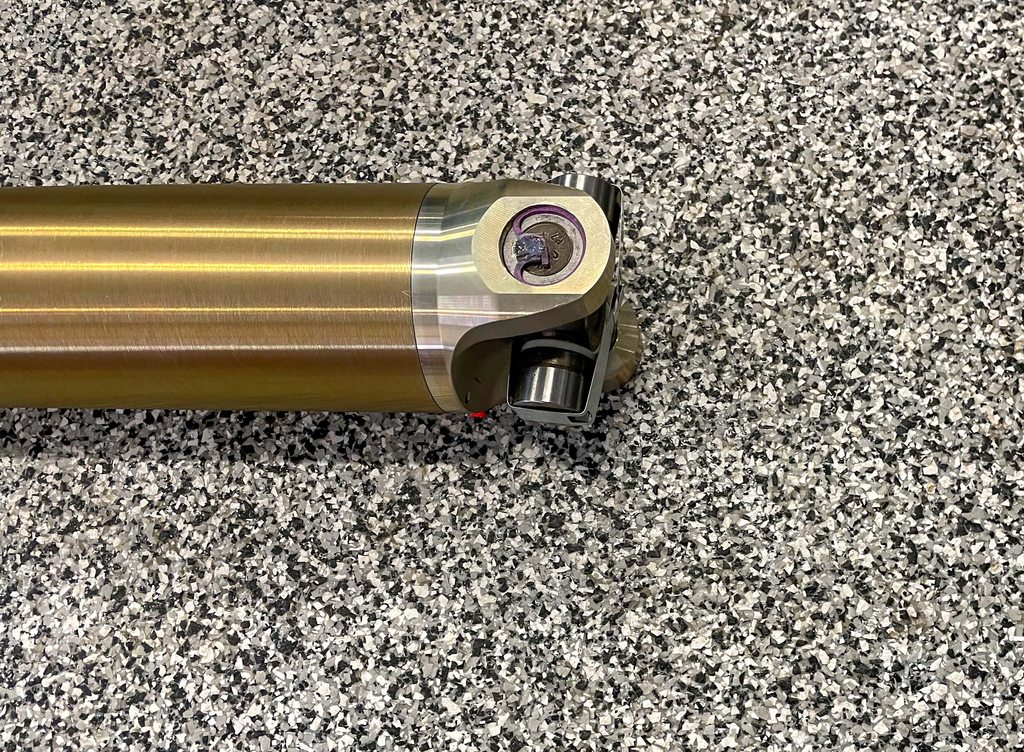 That's all for now. Down the road, I'll show you some other details...
|
| The Following 9 Users Say Thank You to Arrowsmith For This Useful Post: | ||
big gear head (03-26-2023), BJCHEV396 (03-26-2023), Chuck_Burg (04-11-2023), Dave Rifkin (03-26-2023), dykstra (03-26-2023), jer (03-25-2023), L78_Nova (03-29-2023), PeteLeathersac (03-26-2023), Xplantdad (03-26-2023) | ||
|
#56
03-26-2023, 06:03 AM
|
||||
|
||||
|
Outstanding!!
__________________
https://www.youtube.com/watch?v=gkDf7PPRzJ0
|
| The Following User Says Thank You to BJCHEV396 For This Useful Post: | ||
Arrowsmith (03-26-2023) | ||
|
#57
03-26-2023, 05:38 PM
|
||||
|
||||
|
Did they tell you what the filler material was for the welds on those headers? The color of the weld on that flange looks like silicon bronze. I've run into problems at work with 7075 aluminum. The guys that I work with keep making parts from 7075 and then bring it to me to weld it. They aren't very happy when I tell them they have to make it over again out of 6061. I didn't see any signs of balancing the shaft. How did they do that?
__________________
Freddie 1969 Camaro RS/SS396 (427) 4 speed
|
| The Following User Says Thank You to big gear head For This Useful Post: | ||
Arrowsmith (03-26-2023) | ||
|
#58
03-26-2023, 05:53 PM
|
|||
|
|||
|
Quote:
Not sure what the filler material was on the headers. I'm sure Lemons would tell you. L-O-L on welding 7075. I think a lot people look up the specs of 7075 and have visions of welding it but reality can change that pretty quick! I found something on the Internet about welding it, but it seemed way out there. Mark physically screws the weights to either end of the shaft, on the yokes, and it passes SFI testing too. The goop is to keep folks from tampering with it (or at least, scare them). Here's one image: 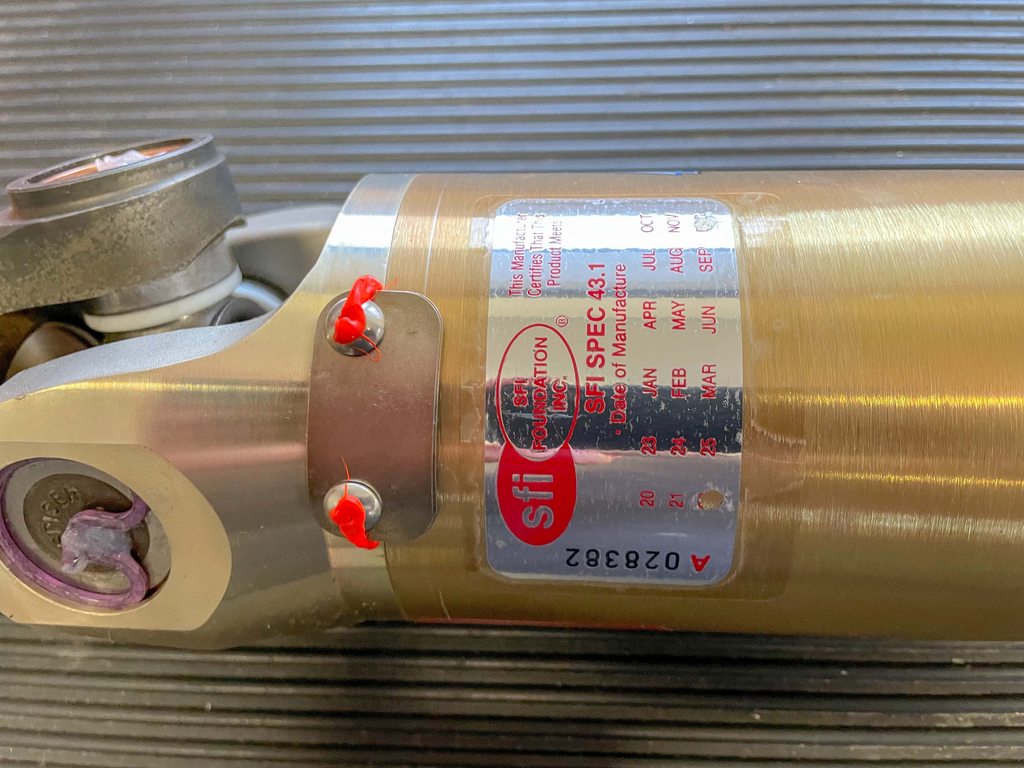
|
| The Following 4 Users Say Thank You to Arrowsmith For This Useful Post: | ||
|
#59
03-26-2023, 10:02 PM
|
|||
|
|||
|
An interesting part about Lemons Headers is that, in addition to the engine and chassis, the headers are built for the cylinder head exhaust port (size and location). This is particularly important with raised exhaust ports. In my case, the Brodix BB3 XTra exhaust ports are raised 0.600-inch. I had a set of Hooker Race Headers here and I tried them. They weren’t even close to fitting. The reason is they’re built for stock production line port heights. In the end, you do get what you pay for with Lemons.
Last edited by Arrowsmith; 03-26-2023 at 10:12 PM.
|
| The Following 4 Users Say Thank You to Arrowsmith For This Useful Post: | ||
big gear head (03-26-2023), L78_Nova (03-29-2023), PeteLeathersac (03-27-2023), Xplantdad (03-26-2023) | ||
|
#60
03-27-2023, 08:28 PM
|
|||
|
|||
|
Nice job on your Nova. I look forward to reading your updates and seeing the photos.
What are you using for a transmission/bellhousing shield ? Just curious.
__________________
Mike '83 Monte Carlo '69 Nova '62 Bel Air 'bubble top'
|
| The Following User Says Thank You to MonteMike79 For This Useful Post: | ||
Arrowsmith (03-27-2023) | ||
|
|
|


 Linear Mode

